STEPS:
(1) determine size of rope /bell proportions
(2) acquire tools
(3) strop thimble
(4) lay up puddings
5) cover puddings
6) finish covers
(7) apply decorations
(8) varnishing and preservation
(9) hanging rope from clapper
RECOMMENDATIONS:
Few of us have an “Old Salt” living next door to answer questions on knotting or to show
us how to turn a ball of cord into a beautiful bell rope. The next best thing is to have a
book to help answer any questions that may come up. There are hundreds of books
written on knots and knotting, but three stand out:
“The Encyclopedia Of Knots and Fancy Ropework,” by Raoul Graumont and John
Hensel, is an incredible source of inspiration, but isn’t really written for the novice.
“The Ashley Book of Knots”, by Clifford Ashley, is far and away the best for the beginner. It
uses drawings to clearly show how to tie literally thousands of knot
The Encyclopedia and Ashley’s Book are quite expensive, but worth every penny you pay
for them. They may also be available at your local public library, and are often listed on
EBAY.
I also heartily recommend "The Harrison Book OF Knots," by P.P.O. Harrison, if you
can find a copy. It’s a wonderful book and a major piece of armament for any knot tyer
wishing to know more about bell rope construction and design. (see Marty's site below
Another great source of information is the International Guild of Knot Tyers. The IGKT,
has an extensive online photo gallery that showcases some of the best knot tyers
around. They also have a forum which may be utilized for questions!
The quality of the finished product is directly related to the type and quality of the line you
use. The cotton seine twine or braided nylon mason’s cord you generally find at the
hardware store is far too soft, and will not hold its shape and appearance when worked
tight.
Two of the very best sources for high quality line are R & W Enterprises and Marty
Combs. R & W Enterprises provides an extensive array of nylon cord in just about any
size and color you can think of. Their online catalogue isn’t much to look at, but a phone
call to them will get you samples, and I’ve found their prices to be quite reasonable.
Marty Combs carries some of the finest hard laid cotton cordage around, (it’s my
personal favorite), as well as a wide selection of books, videos, tools, and supplies such
as needles and thimbles, as well as that bell-rope video I mentioned.
(1) PROPORTIONS
Before you cut the first piece of line, you should have a pretty good idea how long the
finished bell rope will be, and whether you want it tapered or straight. On small bell
ropes for pleasure craft, a straight up-and-down construction is just fine, a lot faster to do
and perfectly acceptable. On larger vessels and military craft, or bell ropes that will be
used for ceremonial purposes, a tapered profile is called for, and that's what this tutorial
will cover. You can do the straight rope using these instructions by just making all your
core "puddings" the same length.
The proportion of the diameter of the bell and the length of its bell rope is critical. As a
general rule, I like to figure on a 4:3 relationship. For example, if the bell has a diameter
of 12 inches, the bell rope would be 9 inches long.
There are two exceptions to this “general” rule. First off, for bells much larger than 20
inches, or smaller than seven, you have to use your own judgment. It’s always a good
idea to take a piece of rope, and attach it to your bell. Cut off about where you think the
bell rope will end, step back and see how it looks. Adjust as needed to get just the right
length.
The second and most important exception is for ceremonial bell ropes. These beautiful
examples of the sailors craft seldom feel the hand of a normal watch stander, but are
most often used when you need to “dress for company.” Often, they are much longer
than normal, most often tapered, and much more decoratively covered than working bell
ropes. When it comes to “show pieces”, the sky is really the limit.
This tutorial shows the construction of a ten-inch long tapered bellrope. If you want to
make a one that’s straight or tapered differently, that’s ok. There isn’t a wrong way to do
it! This is supposed to be FUN, so HAVE fun! Experiment, change, delete or substitute
instructions.... enjoy yourself! If you find something that works better, let me KNOW and
I'll amend this with your suggestions..
(2) TOOLS
Depending on how small the bell rope and line are and how intricate you're going to get,
you may need line-pullers, needlenose pliers and an exacto-knife, but for this tutorial, all
you'll need are a small 'scratch-awl' with a slightly blunt tip and a pair of good, sharp
small diagonal cutters for cutting line, a bottle of THIN or FAST SETTING cyanoacrylate
(superglue - cheapest when bought in bulk...try EXOTIC BLANKS website), some scrap
cardboard and (if you want to use them) some bamboo skewers, along with your
cordage. For cordage, you'll need scrap rope/cord to make the 'puddings", a small
thimble for the eye, a small shackle to connect the rope to the clapper's bail, sufficient
cordage for the coverings and also for the decorative turkshead, plenty of small stuff for
constrictor knots and some black heavy button thread for making locations. Stock up on
patience, while you're at it... You'll need it in profusion later!
For 'small stuff" to do the constrictor knots, I recommend a good sailtwine...
DUCKWORKS sells waxed and un-waxed sailtwine at a reasonable rate... I'd use UN-
waxed for the constrictors and waxed for the strop (see #3), but you can use un-waxed for
both and still get a superior job. OR: you can simply take several 3' lengths of whatever
cord you'll be using to cover the bell and strip it into three pieces... These make good
constrictors, will produce a nice cover on the strop and it's a lot cheaper than ordering
something else you'll rarely use. The colour will match, as well... It's what I use mostly
now. (Dental Floss may give it a nice, minty smell, but it just don't look right IMHO.) You
choose which you'd like to use, but from now on when I'm referring to 'small stuff",
that's what I means.
While a professional looking job requires a good hard-laid cordage, you CAN get by with
#18 mason line from the hardware store, as long as it is tightly laid. For the turksheads
especially, the hard lay will keep the turkshead's appearance good... Softer laid lines will
tend to 'flatten' out when worked and this makes for a lumpy and sloppy finished look.
That's why I recommend Marty's site and materials...his lines, especially the #15b, are a
good hard lay and hold their shape despite aggressive working.
(3) STROPPING THE THIMBLE
This is the main support for the bell and it needs to be strong.... the thimble just prevents
wear on the inner part of the strop eye as it works against the clapper bail, but the strop
does all the work, so:
Take your thimble and lay up as many strands of cordage as it takes to fill the thimble's
saddle almost completely... you want to leave a bit so that when we wrap the strop, the
wrapping will fill it the rest of the way, and even be a teeny bit larger than the saddle...cut
your lines to 26" and middle them around the thimble... that'll give you 13" on a side... take
a piece of black buttonthread and put a constrictor on each side 1/4" below the end of the
thimble, then take the strop OFF the thimble....
There are several ways of wrapping the strop eye: you can serve it, you can take another
piece of small line and half-hitch it , or you can do a ringbolt coxcomb.... that's my favourite
as it looks the neatest.
At the point where you put one black constrictor, (SEE RINGBOLT TUTORIAL for a
pictorial on doing this!) take three lengths of small stuff, knot the ends and make them
fast to the strop's pudding with another constrictor... keep a tension on the strop (I tie one
end off on a chair-back and sit on the other end in a second chair: this gives a good
straight-line tension on my workpiece) while working. Take one of the three pieces of
small stuff and tie a half-hitch to the right, then the next piece and tie a half--hitch to the
left, then the last piece and tie a half-hitch to the right again.... at this point you have two
lines going right and one line going left.... take the one on the RIGHT that's furthest from
you and tie another half hitch going left...now you've got two going left and one going
right.... and that's the key.... the one furthest away of the three is always the next one to be
tied and it ties so that it ends up in the other direction...
(An' De hip-bone connected to de thigh-bone, and de thigh-bone connexted to the knee-
bone, an....")
DON'T pull these hitches real tight.... we're not trying to strangle Aunt Louise, just make
sure she's not getting outta the house anytime soon.... if you pull these really tight, you'll
make it very difficult to bend the wrapped strop around the thimble later on. Pull the
hitches tight enough that they just 'bed' into the pudding and check your work to see that
each turn is laying true and does not 'jump' the previous hitch on the bottom.... this
happens all the time and when you find one, stop and pull the work until you can correct
it. YOU'LL know it's there if you don't fix it now, and it will leave a void in the pattern.
Continue this until you reach the other black thread constrictor, toss another constrictor
on the three lines and trim them off short. If you did this right (and I'm sure you did) then
you'll have a nice row of hitches directly down the centre of the top of the strop.... that's a
'ringbolt coxcomb' and you can use it on a LOT of things.
Take the wrapped strop and put it in the thinble's saddle, even the ends and put another
constrictor on it to make up the ends together and to form the strop to the thimble's
shape. It may be hard to bend, but fuss with it until it is tight in the saddle and the ridge of
knots runs straight and centered along the strop.... this can take some 'foozling' to
accomplish, but don’t give up... the end result is worth it.
If the strop is now bigger than the saddle, you may want to put a constrictor around
thimble and strop at a few points to make the strop conform tightly to the thimble... use up
to five to do this... if you need more, the strop is too large and probably won’t fit no matter
what.... either cut that one apart and remove a line or start another that's a bit smaller.
(TIP: IF IT AIN'T RIGHT, RE-DO IT UNTIL IT IS RIGHT. If you have to throw something out
and start again, so be it. I can't think of the number ot times I've goten half-way thru a
project, discovered an error at the beginning and just pulled out the work and re-did it
correctly. Beleve me, it's worth it in the end....)
Now I'll assume you got the strop attached to the thimble, in place and running true and a
constrictor at the base of the thimble... on to the puddings...(
4) PUDDINGS
The core of a bellrope is comprised of a number of small pieces of rope/line which are
laid up together and then stopped off with constrictor hitchs in small stuff. WHY do they
call it a pudding? I’m damned if I know. I certainly wouldn't care to eat one, and I doubt
Jack Aubrey, fond as he was of "Spotted Dick," would care to partake, either.
For a 10" long rope, we've already set the main cores at 13".... (I do this so that I can trim
off nice and square and have a bit of line to pull on when trimming... and what's 3 inches
more or less between friends?) so now it's really up to your taste and the proportions of
the bell you're building as to how large to make the puddings, how many steps to put in
them, and the like, but here are the basics: (If you want a very stiff bellrope, before you
do this take one or two bamboo cooking skewers and put them in the center of the core
lines and then constrictor around the whole thing. Otherwise, just rely on the core and
additional coverings to provide a firm body.)
Make fast the 13" center cores all the way to the end with a constrictor knot in smallstuff
every (appx) 3/4". Measure down from the TOP of the strop/thimble about 4" and use this
as a starting point for the first layups.
(Incidentally, I am constantly asked about the size of the rope for the puddings: IF I have
some larger line, I'll incorporate the strop lines and use that combination as the FIRST
pudding, but I almost always make the majority of the puddings out of scraps of 15B left
over from other projects. I get a LOT of scraps!)
Take as many pieces of cordage as will completely cover the inner core without bulging
out and cut them to nine inches.... constrictor these over the core at 3/4" intervals. Keep
the ends facing the thimble (up the rope) as even as possible so as to form a 'step"...
important later on... Go down another 3" and do the same thing... as many pieces of
cordage as will cover the new core diameter without bulging and constrictor... go down
another 3" and do it again.... Now you should have three 'steps" up along the rope. Trim
off all the steps so that they’re fairly flat and even around, then put another constrictor right
at the edge of the steps so as to pull the profile into a bit of a rounder aspect. At the other
end, measure from the strop/thimble top to your final length and put TWO constrictors
about 3/16" apart at that point.... you will trim this off so it's square and even across the
base of the bellrope. (If you want a rounded bottom profile, you can shape the bottom a
bit at this point, but the finial turksheads and bottom cover will also help this.
Check your work to be sure it's even and symmetrical around and does not bend off in
one direction or another along the axis... if it does, just work it until it's straight and
plumb. A couple more constrictors here and there ain't such a bad idea, either,
especially if you used soft line for the puddings and it looks like me wearing tights...kinda
bulgy, y’know? Constrictor them bulges into shape now for a better apearance in the
finished product.
OK: we've got the thimble stropped and the puddings built up.... the end is trimmed off
nice and regular and there are more constrictors than Carter got Little Liver Pills...
essentially, your bellrope is done. All that's left is decorations! (Oh, one thing.... I like to
put a grommet or a wrap of cord around the core at each step... it softens the transition
and gives the decorative turksheads you'll put on over the covers a less 'abrupt' size
transition. You'll have to experiment since I can’t tell how 'wide' a step you'll make, but the
rule of thumb is to put one grommet on that gives a finished diameter a litle less than the
next step, then one next to that which gives a transition to the smaller core... It's NOT a
necessary step, but it is a nice refinement.)
(5) COVERINGS
The accepted method is by using a continuous crown hitch, a continuous wall hitch, an
'over-two' fender hitch or a simple grafting or cross-pointing. Maybe some kind soul will
do up a tutorial on cross-point work (coachwhipping), but that's one I can't do myself, so I
usually use the "over-two" hitch. I reserve grafting for only special commission work as it
takes for-(censored)-ever to do and is so easy to screw up.
Here are tutorials on OVER-TWO HITCHING and, for those who WANT to put themselves
through a torturous experience, on GRAFTING.
I’m gonna use the “over-two fender hitch” for this example.
Marty Combs made a great suggestion that you start in the MIDDLE of the bellrope and
work out to both ends.... it gives you more control and a better grip for the holding hand,
and since the pattern works the same either way, it is an invisible start, so:
For the stepped bellrope, figure out how many lines you’ll need from the SECOND step
back towards the strop eye and cut them a little longer than you ordinarily would so you’ll
be sure to allow for the increase in diameter of the third and fourth size steps toward the
end, then follow the directions in HITCHING. When you get to the first step, drop out a
couple-three lines (experiment with this....how many to delete depends on the size of the
steps involved!) so that you continue a nice tight hitch up to the strop eye, and finish it with
a constrictor or seizing about 1/4” below the thimble.
You’ll coverthis area with a turkshead or a footrope knot.
Now to do the bottom two sections: add enough strands to continue the hitching over the
increase to the next step and then do the same at that step on down to the bottom.
This time you want to end the hitching at about 1/2” from the edge of the bottom, and
constrictor it real good and tight. Trim off all the excess lines and you’re ready to “box” the
bottom.
(6) BOXING THE END
Take some small stuff and lay about nine or twelve (or fifteen, or... obviously, the larger
the end, and the finer the threads, the more you'll need and the crazier you'll get... ) pieces
in parallel across the bottom, constrictoring them so they lay flat but not so tight as to
prevent the next step:
Take a strand of small stuff and weave it under three over three in the center.... take
another and continue doing this until you’ve “boxed” in the bottom with a 3 over 3
boxweave.
I use a homemade line puller to do this... an 8" piece of #24awg piano wire (also sold as
a HEAVY guitar string in guitar stores... I get mine from "Musician's Friend" in bulks of
12@ 36" long) that is then folded in half and crimped about 1-1/2 inch from the bitter ends
(bend both legs 90° into the center and then 180° back and then 90° again to resume
their former direction: do a simple 4 or 5 line crown and crown through the crimps,
continuing until the bitter ends are buried and then just varnish the whole or wet with
cyanoacrylate... I use that because it dries in less than two minutes andI'm good to go.
To get the "scimitar" shape, just take your pliers and put a tiny bend in one of the two legs
of the loop. It keeps the loop open and creates the shape.
(Yes, I DO sell 'em.)
These die after about 10 hours of use (they break at the tip of the loop) so make up a few
at once.
Stick each end under that constrictor knot as you finish the weave. How many total you
will need depends on how wide the bellrope bottom is, but usually 4 sets across will
suffice.
Put ANOTHER constrictor over the ends and do this one fairly tightly, then fair up the
boxweave so it’s nicely perpendicular to itself and sheet home the constrictor knot.
Once you're faired up, put a constrictor directly under the lip (by about 1/8") and finalize the
fairing up, fuss with it, then trim the ends so they are flush with the end of the hitching and
apply turksheads at each step and at the bottom. (Remove the other constrictors when
you put on the 'last one".
Viola! Finished boxed end...
(OK, I KNOW it's supposed to be "Voila"... I just LIKE "Viola"!)
(7) TURKSHEADS or DECORATIONS
I usually use a 5x4 at the strop, another 5x4 at the first step, a 7x6 and the second step, a
9x8 at the third and an 11x10 for the bottom, being sure that the turkshead ‘laps’ over the
end and hides the boxweave edges. An alternative as most people use is to make a
‘globe’ knot (Ashley’s #2217) in a larger line and close off the bottom of the bellrope with
this INSTEAD of the boxweave. These always seem to be a bit ‘bulbous’ to me and it’s
not a look I love, but it IS the most common way of finishing off the end of the bellrope, so
I’m probably outta step with the rest of the parade. Usually am. (See the picture at the
end of this tutorial of Dave CONSIDINE'S rope)
You certainly can use any combination of turkshead sizes that cover the transitions, and
NOW the reason for those grommets becomes apparent: they provide a smoother
transition from step to step and you can use a smaller turkshead if you so desire, or none
at all for a plain rope.
Another thought is to get Don Burrhus' "Turkshead Cookbook" and turkshead tool and
make one of the over 200 variations he shows therein... he also has Vol.2 out for sale
now with an additional 300(+) "oddball" turksheads, some of which are quite striking.
Whatever you use, I find that it is best to do up the turksheads (especially on the end) in
two stages... I'll cast and expand the turksheads onto a piece of cardboard. USE CLEAN
WHITE CARDBOARD! Even an index card with lines will leave blue marks!!!
You can get "OakBoard" stock from any printer in small quantities or get heavy (60# or
more) paper at Staples.)
Cast your turkshead onto the cardboard and tighten up 'till it's rather snug, then work the
cardboard out and do a final fairing up of the turkshead. It's more work, but the cardboard
presents an easier-to-move-across surface and actually speeds up the process. Don't
do the initial setup so tight that you can't get the cardboard out from under it, though!
Practise, Practise, Practice.
(8) PRESERVATION:
Varnish is the usual method of finishing the bellrope to preserve it, and it works VERY
well.... there are bellropes in various museum collections which are 150+ years old and,
while I wouldn't want to try to use one one a bell, most of them are in remarkably good
shape for their age.
Spar varnish will turn cotton line a deep golden brown, nearly black at times, and you
should varnish the body of the rope before adding the decorations, then varnish them as
well. This is to be sure the varnish is protecting the whole body of the bellrope. Clear
polyurethane is something that has been reecommended to me as producing a hard but
essentially clear finish with minimal discolouration of the line.... I've not tried it, but it
makes sense. Stay away from shellac. It softens in heat and leaves a sticky residue on
your hands and clothing when this happens.
[Those who have been here before read about the "Elmer's Glue" option for finishing...
(dilute elmer's White Glue 1:8 in hot water and either soak or paint the exterior.)
Don't bother. Looks like (censored).]
(9) HANGING AROUND
Well, the only traditional way to attach the rope to the clapper of the bell is with a small
shackle connecting the thimble eye to the clapper's bail. A 3/16" for small bellropes
(such as ours) and proportionally larger for bigger bellropes/ships. NEVER tie or lash
the thimble to the clapper bail unless you have no alternative.... if absolutely necessary,
use a mini-carabinier in black.
I DO have a source for brass shackles... if you need any,
please email me. $10 @ ppd.
(Since writing this, I have seen a bellrope where they took two throat thimbles, opened
one sufficiently to accept the clapper bail and the other to go around the strop-eye of the
bellrope, then did a throat-seizing around the two and used that. Rather permanent and
a LOT of work, but it did look interesting.)
I hope that this will give you the tools to build your own bellrope and have fun doing so....
there are many examples of bellropes on the net to look at, but I especially recommend
the examples on Marty’s site, as well as those shewn on the IGKT’s main web gallery.
KHWW has a picture gallery as well that has quite a few bellropes shewn .
I realize this and the ancillary tutorials have gotten a bit LARGE but I hope that the
information is presented in sufficient detail to aid most readers.
As always, should you have questions on this or any other knotting issue, please feel free
to EMAIL me and I'll try to help you out.
Fair winds to all
VB
| Making a Bell-rope by Vince Brennan with help from Marty Combs and several great books |
| ~~~~~~~~~~~~~~~~~~~~~~~~~~~~~~~~~~~~~~~~~~~~~~~~~~~~~~~~~~~~~~~~~~ |

| Click on ANY picture to see a larger version: Small pictures here are to allow dial-up customers easy access |
| Last updated 2017-03-06 |
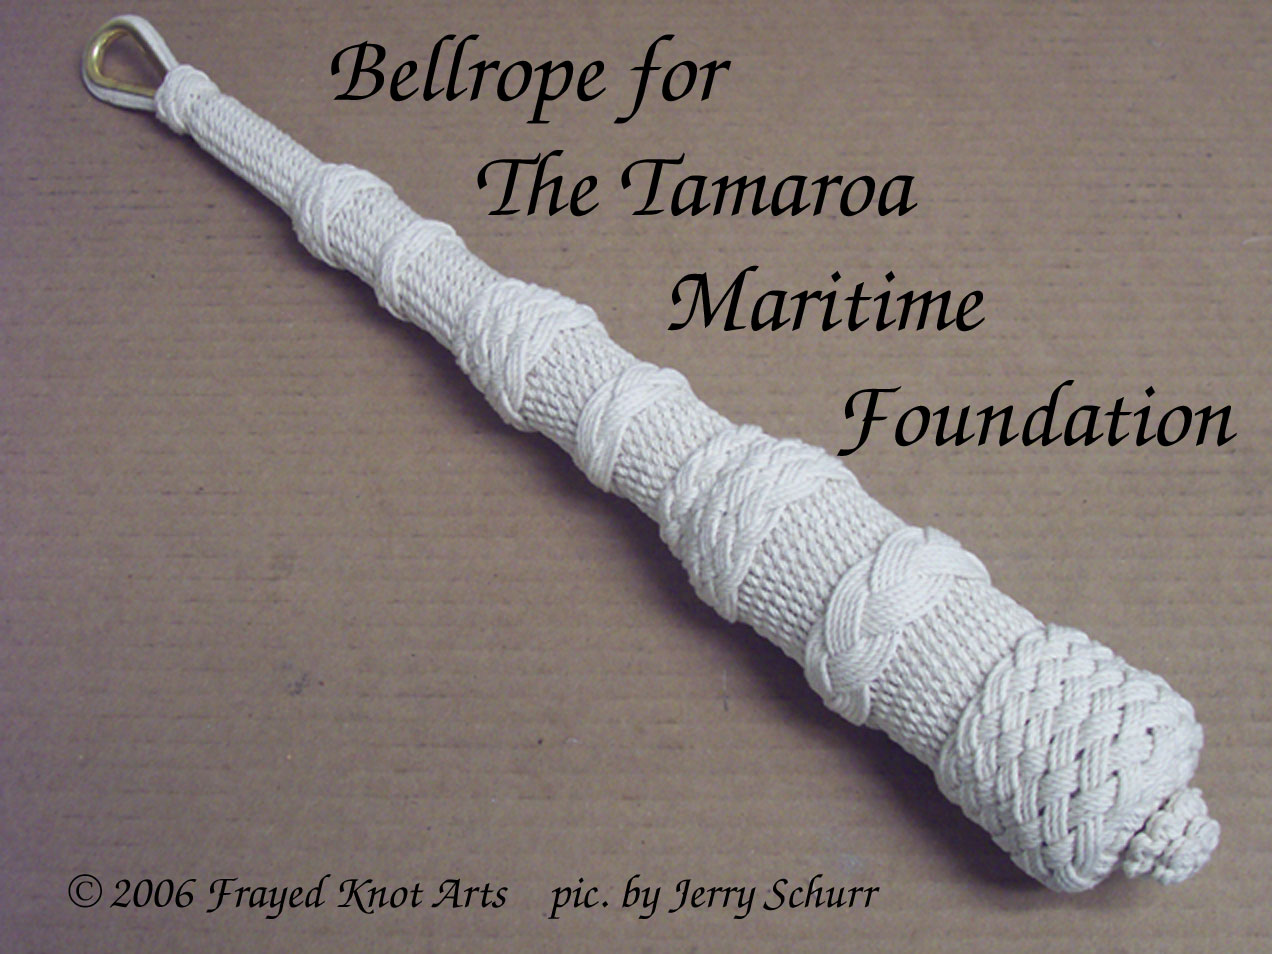
Years ago I learned how to do this while in the Navy, but
lost the knowledge between then and Oct 2006, when a
chance encounter with the ZUNI/TAMAROA Maritime
Foundation found me promising to make one up for
them.
I realized that I'd totally forgotten the basics, but
remembered that Marty Combs, from whom I buy a great
deal of my raw cordage, had a bellrope-making video
listed on his website. He sent one with the next order
and I watched it and it all came back!
As a result, ZUNI/TAMAROA has her 20" bellrope and
you are now reading this tutorial on how to make one so
YOU won't have to experience the sinking feeling of
realizing that, once again, your alligator mouth has
over-ridden your jaybird... ahhhh... patootie.
NOTE: This is written with the
amateur knotter in mind... for those
who have experience already in
knotying, I beg your indulgence if I
over-stress some of the basics.
amateur knotter in mind... for those
who have experience already in
knotying, I beg your indulgence if I
over-stress some of the basics.


As always with ANY of the tutorials, if
you feel you can clarify or improve
the exposition in any way, please
feel free to contact me, especially if
you can do better pictures (a
groundhog could do better pictures!)
than I!
you feel you can clarify or improve
the exposition in any way, please
feel free to contact me, especially if
you can do better pictures (a
groundhog could do better pictures!)
than I!
If you would like to take better pictures of the process and send them to me ( a bloody SQUIRREL could take better pictures than I !)
I would be delighted to use them in the stead of these. EMAIL ME with any questions or comments you may have.
I would be delighted to use them in the stead of these. EMAIL ME with any questions or comments you may have.
(Incidentally, no financial interest in
ANY of the companies or
individuals mentioned... although I
wish I did...)
ANY of the companies or
individuals mentioned... although I
wish I did...)
| Hold on.... I mentioned cyanoacrylate above and then didn't expand on it..... I use this for many things, but most importantly for treating the ends of the lines used in doing the coverings to prevent fagging (or fraying, if you prefer)... just a drop on the tip of the line will provide a nice "ferrule" which will stop the line from fagging out and also make it much easier to pass one line thru the loops formed by the others. For threading thru things like turksheads, do a 1" length and then clip the end at a 45° angle. PRESTO! Instant needle! Also, there's your scrap cardboard: do ALL your CA glueing over the scrap cardboard and you'll not get it on the floor or rug... won't have the First Mate climbing up your nose for ruining her floors. I found THIS one out the hard way, so DO benefit from my pain and travail. USE THE BLOODY CARDBOARD! You can also CA over the end of the bellrope core if you want a hard surface for the finish work...it does make "lapping" a turkshead easier. If you're using CA for anyting, STAY AWAY FROM THE FUMES. Keep your face away from them, try NOT to breathe them in at all....highly nasty stuff it is entirely, but it sets VERY fast on natural lines and with about a hour's delay on most nylon lines. GOOD BULK SOURCE: EXOTIC BLANKS website! |
A brief word here on the length of the lines
for the "over-two" cover: The HITCHING
tutorial says leave 6.5 times the overall length
of the finished work, which is more than
enough for the average straight sided round
object or a bellrope with no change in
diameter, but with stepped bellrope
construction, that'll leave you short, so
increase it to 7.5 times the finished length
and, depending on how many lines you'll
need to cover the fattest part, even 8 times.
It's not an exact science, I'm afraid but it's
always better to have a lot of excess than to
run short. Of course, you can always stop
and restart the procedure with an entirely
new set of lines if you need to and cover the
juncture with a turkshead, but excess can be
used for puddings for future projects, for
stropping or to tie up your Budgie so it can't
escape.
I'd be grateful if you let me know what your
experience is with this and we can form a
consensus. (May even get elected MP for
Lower Boxing!)


| ...................................................................................................................................................................................................................................... |
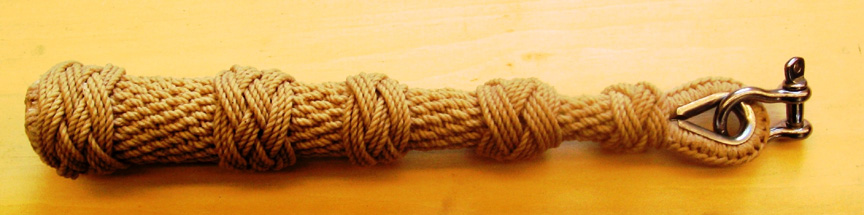
Have YOU made something from the bellrope page's instructions? Here's a bellrope by David Considine using the instructions
above and after varnishing. Damn nice work!
OTHER EXAMPLES of ropes done with the aid of this tutorial (scroll down past David Largent's 69"
monster!)
above and after varnishing. Damn nice work!
OTHER EXAMPLES of ropes done with the aid of this tutorial (scroll down past David Largent's 69"
monster!)