Over-two refers to the fact that you are making a simple crown hitch but going over two lines
instead of over one.... sounds simple, but there’s a real trick to doing this:
Theimportant points are:
(1) keeping track of the line being tucked and the progression,
(2) tucking the last two lines, and
(3) the method of tightening the hitch to the work.
Now, I can’t tell you how many wefts to make up around the work, that’s something you’ll have
to figure out for yourself, but the rule of thumb is figuring out how many lines fit in one inch,
multilying that by the circumference, then dividing the total by 2 and adding one line... so IF
you have a 6” circumference work and IF your lines are 1/8” , you’ll wind up with 25 lines
(approximately). When it comes to math, I’m all thumbs, so that’s the method I use.
Example:(1/8" line = 8 lines per inch x 6” = 48 / 2 = 24 + 1 = 25) It ain’t pretty, but it DO work.
(sometimes.)
Figuring the circumference of the work is fairly complex if you use mathematical formulas
(lessee: measure the diameter, then half that for radius, then Pi x R squared, throw away the 6
and put in a Genoa Jib.... ahhhh, the hell with it.) Just take a piece of butchers twine or heavy
white thread and wrap it around the work to be covered three or four times.... hold it in place
and make a pencil mark across the wraps, unwrap it and measure the distance between the
marks.... close enough for Navigation! If you wanna be even closer, measure the distance
between ALL the marks and average them out. Works for me and it don’t strain my brane.
Another tricky part is how LONG to cut the lines you’ll use for the hitching.... I’ve never really
solved it well. I’m sure there’s a formula (damn formulas again!) for how long to cut the wefts
in relation to the diameter of the line used with consideration for the ends, but I just take a shot
and pray. I usually wind up “on the side of the angles and (Angels? Yah, them.) have line left
over, but that’s OK too, and you can use it for puddings for chest beckets and more bellropes
and like that, or (if you have more than a 1 foot piece) strip it out and use the parts for
constrictors. If you DON’T allow enough, you may need to stop halfway thru the hitching and
start again with a new set of lines, and use a turkshead to cover the join. On most work you’ll
have a decorative turks somewhere along the length of the work, so that’s no disaster,
(CHANGED!) but I'll generally leave 6.5 times the length of the core or maybe a bit more....
You'll quickly get the hang of how much is enough as you do several pieces with this covering.
MAKE NOTES of the size line used in covering, the number of lines used 'around' and the
diameter of the work vs. the covering lines...
OK: now you’ve got the diameter of the work and the number of wefts* to use, make them up
around the work at one end about an inch from where you really want the hitching to start ....
the easiest way I can think of to get the wefts around the work is to "roll them on"... take a small
line (sailtwine or very heavy thread) and clove hitch around the work for a tautline, then slowly
roll the work either toward or away from you as you prefer and add wefts as the tautline comes
to bear on the work....
(*=wefts: the lines running ALONG the work which will be tucked to form the fender weave.)
After you've added the correct number of wefts, arrange them more-or-less evenly around the
work and then put a constrictor on ‘em to make ‘em fast. Leave about seven or eight inches
hanging loose on the lower end so you’ll have something to use when you come back to back-
hitch. The hitching will (provided you have the correct number of lines selected) even itself out
for you as you go along. You’ll back-hitch the work up to the finish point as a last step and you
will then eliminate any irregularities you may have when starting this off.... trust me, it works.
Keeping track of the lines to be tucked is accomplished by the following trick: use your
thumb. Now, right- or left- handed, the best way to do any hitching job using right-hand -laid
line (the most common) is counter-clockwise around the work being covered: why? because
the lay of the lines being used will naturally tighten up if you hitch in that direction and you need
all the help you can get on this baby. Get used to using your left hand to hold the work and the
right hand to do the tucks. If you’re doing this in nylon cord, it doesn’t matter which hand you
start with since it has no ‘lay’ to it - just remember that if you work holding the piece in your right
hand, reverse all the following directions.
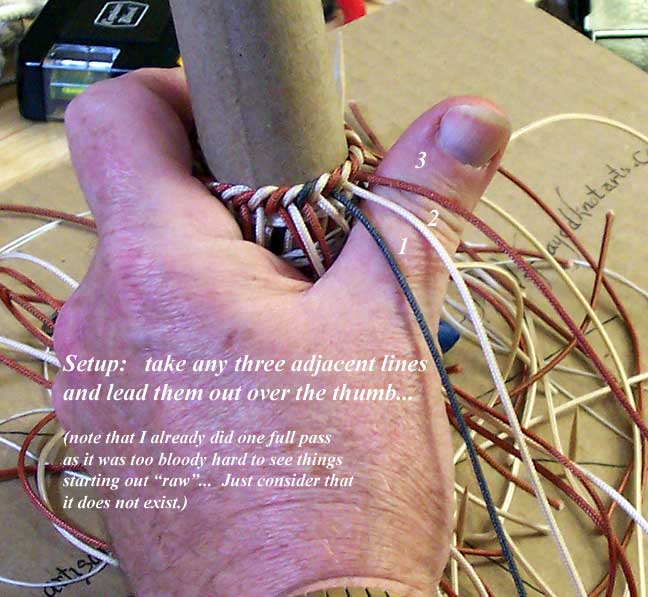
Start by taking any three adjacent cords and, with your left thumb sticking out, drape them over
it...
Take the first cord (LEFT SIDE) and lay it up and over the other two and then back under your
thumb: let the ball of the thumb hold it against the work....
Now pick up the next cord is series to the right and lay IT over the thumb (the other two are still
there...) so you again have three...
Take the LEFTMOST of the three (left side) and do it all over again....
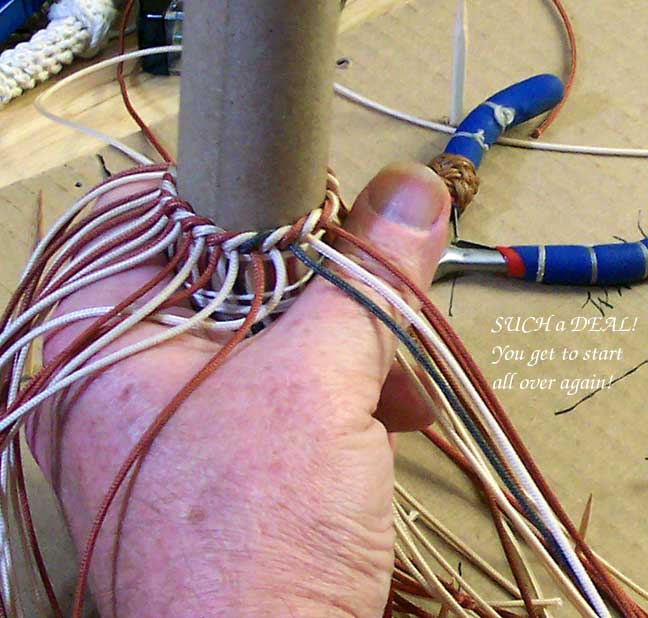
Continue crossing two and picking up one until you have only two cords on your thumb and are
back around to the line that got the first tuck.... now the tricky part.
Take the left cord on your thumb and go over the remaining line and tuck thru the loop formed
by number 1... note that you are still 'crossing two" when you do this....
Take the remaining line and tuck it down into BOTH loop 1 and loop 2. Note that you’re STILL
crossing two lines when you do this.... (ENLARGE THE FOTO!!)
It’ll take you a few tries to get it right (took me MORE than a few before I got it) but once you DO
get it, it becomes second nature.
Now, for tightening up the tucks.... I've tried several times to take pics of this but to no avail.... I
can't control the camera with my feet and I need both hands to do the work, so you'll have to be
content with a written description... forgive me....
I take the work in left hand (just like you did when you were tucking) with the lines draped over
the hand, and rotate the work clockwise until the gap appears. As you turn the work, the lines
wil drag and a definite gap will be created: use this as your starting point.
I grasp the line with my right hand and put my thumb on the work while snagging a bight of the
line between little finger and palm and rotating the hand so that the line, while being clamped
against the palm by the little finger runs out and across the outside of the little and ring
fingers. The middle finger then hooks down and acts as a tensioner while the thumb tip
against the work is your fulcrum.... tightening the middle finger toward the palm and stressing
back with the thumb will tighten the line to the work**.... now, without removing the tension,
lead the line around the work and under the index finger of the left hand and clamp with it, then
go to the next line and repeat all the above nonsense. Always work to the left and rotate the
work slightly in your hand each time you do a line. Gradually work all the way around - you’ll
probably need to do this two or three times around to get it fairly tight, but just get it fairly tight....
(**= this is very tough on the side of the first knuckle of the ring finger, since there's a lot of
stress put on it and also the line will move a bit as you tighten it up.... I suggest putting a
bandaid or some sort of chafing gear on the knuckle so as not to wear a hole in it, and I am
NOT feckin' kidding, neither!) A bloody wound will make some interesting colour variations,
especially when using cotton line. NOT good.
Now start the next row and do all the tucks and then the tugging-in for a snug fit....
(I switched to white cotton because the
nylon was proving recalcitrant and I'd only
used it for clarity. Youse lot are gettin'
coddled like I never even thought on!)
By the third pass, you should start to see a pattern emerging, as well as having the lines sitting
fairly snugly after only two passes.
Ok: Turn on the stereo or whatever and go to it.... just keep on tucking the circles and then
tightening the other way and you should have a fair amount of work finished in about an hour.
Stop. Look at the work. Is it all even? Did you have a problem with tightening up things? Is
there a line sticking out somewhere that didn't get tucked in?
The mark of a good 'over-two' hitch job is when the pattern forms completely vertical, or along
the line of the work. If it has a spiral right appearance, you have too few lines, if you have a
spiral left, too many.
PROBLEMS:
(a) there seems to be a gap in the work when I tighten up everything....
OK: at the next tuck, cut another line to length and add it in to the pattern. If you need to add
two, then add them at opposite sides. If you need to add three, you may have (censored) up
the measurements, or perhaps my formulae are suspect,
(Well, why not? I’VE been a suspect before...) so send me an email and let’s commiserate on
this.
(b) no matter how hard I try to snug them down, there’s a loose ‘lip’ to the courses when I finally
give up, like a shawl collar on a pretty blonde or they just wont snug down neatly...
Probably too MANY lines in the hitching... try dropping a few out one per course until you get a
snug fit around the work but no gaps.
(c) I missed a cord on a previous row...
Until you get used to doing this, pull out the row(s) until you get to the one where the offending
cord is, then continue the work from there. IF IT AIN’T RIGHT, GO BACK AND FIX IT AS SOON
AS YOU NOTICE IT! Otherwise you’ll have a sloppy job and you will ALWAYS know that there’s
an error right there. You’ll probably decide it needs fixing anyway, so you may as well do it
while the delay is minimal. Again, TRUST ME ON THIS!
(d) my hands are sore after about twenty minutes work....
NOT funny! Your hands WILL hurt, especially if you have landsman’s hands and skin (un-
callused) and are unused to working with small, rough line. All I can tell you is that when your
hands start to really hurt, STOP for a day. Whatever you do, you DON’T want to wear open a
raw or bleeding wound on your hands or fingers. (NOT because I like you: I could care less:
But the blood will stain the work and you’ll have to start all over again or splice in to replace the
stained section.... When I first learned to do ropework, I didn’t have the luxury of resting a day
and instead soaked my hands in a heavy brine solution (try THAT on raw skin.... makes a root
canal seem like a vacation!) until I started to get my calluses. Now, if I do two squareknot
belts, I can put a cigarette out on the side of my pinky and never feel it, but YOU don’t wanna do
that, so take it easy, allow your hands to get acclimated and if you need to, get a couple pair of
those white cotton gloves women use when doing their lingerie or handling stockings.... they’
re thin enough that you can still feel what you're doing, cheap enough that you can wear ‘em
out and throw ‘em away easily and white so they don’t dirty up your work. Kevlar sailing gloves
( minus the first joint of the fingers and thumbs) will also do the trick, but they may leave a
residue on the work and they’re HIDEOUSLY expensive. I do this all day, so I just build up the
calluses and ignore the whole thing. YMMV. CAUTION: Nylon cord, especially braided
small “mini-blind” type cord, will eat you alive in nothing flat, going thru a callus as what would
resist any type of manila or cotton ropes like the proverbial “hot knife”.... another reason I went
to white cord above!
OK. Assuming that all is going well, you should have just about covered the work in hand and
be approaching the end-point. Keep hitching until you get to one course away from where you
want to stop, then take all the lines and constrictor them to the work, put another constrictor
on the lines and then you can trim them off and that end will be ready for covering with a
turkshead or whatever you want to use to hide the end.
Now go back to the starting point and turn the work end-for end. You’ll probably have two or
three rows that just don't look as good as the rest of the work, so pull them out until you get to
the ‘good stuff” and then just start tucking again until you get to one course away from your end
point, constrictor and trim as previously and you’re finished. One of the joys of "over-two" is
that it looks the same no matter which end you may work it towards....
You CAN end this off with a footrope knot made up of the (however many) strands you used for
the hitching, but that’s a complicated project and quite easy to screw up.... try it if you’d like to.
Don’t constrictor the ends: convert from an ‘over-two’ to a simple ‘over one’ crown, do an ‘over-
one’ wall beneath it and pass it thru two or three times. It’s a pretty knot but a bugger to fair up
and get looking right.
If you’re going to varnish the hitching, now’s the time to do it, before you put on your
turksheads. You want the varnish to penetrate all the lines in the hitching, and if you apply the
turksheads and then varnish, there will be a section of line ends under the turksheads which
will remain unprotected and prone to ‘wicking’ up any water the work may be exposed to.
Promotes rot. Not good.
Also, if you've done this on a tube as shown in the photos, you CAN (although I promise you
you'll muck it up the first try!) lightly varnish the outside of the hitching, then remove the core
tube and DIP the work in varnish and allow it to dry. This will give you a hollow hitched shell of
ropework. It will NOT be strong and is prone to cracking, but for a display it is impressive: for a
workpiece, such as a needle case, leave the core in place.
If any of the above is not clear, or if you think there’s a mistake, go HERE and get a T.S. chit for
the Chaplain’s office. I’m done wi’ ye!
instead of over one.... sounds simple, but there’s a real trick to doing this:
Theimportant points are:
(1) keeping track of the line being tucked and the progression,
(2) tucking the last two lines, and
(3) the method of tightening the hitch to the work.
Now, I can’t tell you how many wefts to make up around the work, that’s something you’ll have
to figure out for yourself, but the rule of thumb is figuring out how many lines fit in one inch,
multilying that by the circumference, then dividing the total by 2 and adding one line... so IF
you have a 6” circumference work and IF your lines are 1/8” , you’ll wind up with 25 lines
(approximately). When it comes to math, I’m all thumbs, so that’s the method I use.
Example:(1/8" line = 8 lines per inch x 6” = 48 / 2 = 24 + 1 = 25) It ain’t pretty, but it DO work.
(sometimes.)
Figuring the circumference of the work is fairly complex if you use mathematical formulas
(lessee: measure the diameter, then half that for radius, then Pi x R squared, throw away the 6
and put in a Genoa Jib.... ahhhh, the hell with it.) Just take a piece of butchers twine or heavy
white thread and wrap it around the work to be covered three or four times.... hold it in place
and make a pencil mark across the wraps, unwrap it and measure the distance between the
marks.... close enough for Navigation! If you wanna be even closer, measure the distance
between ALL the marks and average them out. Works for me and it don’t strain my brane.
Another tricky part is how LONG to cut the lines you’ll use for the hitching.... I’ve never really
solved it well. I’m sure there’s a formula (damn formulas again!) for how long to cut the wefts
in relation to the diameter of the line used with consideration for the ends, but I just take a shot
and pray. I usually wind up “on the side of the angles and (Angels? Yah, them.) have line left
over, but that’s OK too, and you can use it for puddings for chest beckets and more bellropes
and like that, or (if you have more than a 1 foot piece) strip it out and use the parts for
constrictors. If you DON’T allow enough, you may need to stop halfway thru the hitching and
start again with a new set of lines, and use a turkshead to cover the join. On most work you’ll
have a decorative turks somewhere along the length of the work, so that’s no disaster,
(CHANGED!) but I'll generally leave 6.5 times the length of the core or maybe a bit more....
You'll quickly get the hang of how much is enough as you do several pieces with this covering.
MAKE NOTES of the size line used in covering, the number of lines used 'around' and the
diameter of the work vs. the covering lines...
OK: now you’ve got the diameter of the work and the number of wefts* to use, make them up
around the work at one end about an inch from where you really want the hitching to start ....
the easiest way I can think of to get the wefts around the work is to "roll them on"... take a small
line (sailtwine or very heavy thread) and clove hitch around the work for a tautline, then slowly
roll the work either toward or away from you as you prefer and add wefts as the tautline comes
to bear on the work....
(*=wefts: the lines running ALONG the work which will be tucked to form the fender weave.)
After you've added the correct number of wefts, arrange them more-or-less evenly around the
work and then put a constrictor on ‘em to make ‘em fast. Leave about seven or eight inches
hanging loose on the lower end so you’ll have something to use when you come back to back-
hitch. The hitching will (provided you have the correct number of lines selected) even itself out
for you as you go along. You’ll back-hitch the work up to the finish point as a last step and you
will then eliminate any irregularities you may have when starting this off.... trust me, it works.
Keeping track of the lines to be tucked is accomplished by the following trick: use your
thumb. Now, right- or left- handed, the best way to do any hitching job using right-hand -laid
line (the most common) is counter-clockwise around the work being covered: why? because
the lay of the lines being used will naturally tighten up if you hitch in that direction and you need
all the help you can get on this baby. Get used to using your left hand to hold the work and the
right hand to do the tucks. If you’re doing this in nylon cord, it doesn’t matter which hand you
start with since it has no ‘lay’ to it - just remember that if you work holding the piece in your right
hand, reverse all the following directions.
Start by taking any three adjacent cords and, with your left thumb sticking out, drape them over
it...
Take the first cord (LEFT SIDE) and lay it up and over the other two and then back under your
thumb: let the ball of the thumb hold it against the work....
Now pick up the next cord is series to the right and lay IT over the thumb (the other two are still
there...) so you again have three...
Take the LEFTMOST of the three (left side) and do it all over again....
Continue crossing two and picking up one until you have only two cords on your thumb and are
back around to the line that got the first tuck.... now the tricky part.
Take the left cord on your thumb and go over the remaining line and tuck thru the loop formed
by number 1... note that you are still 'crossing two" when you do this....
Take the remaining line and tuck it down into BOTH loop 1 and loop 2. Note that you’re STILL
crossing two lines when you do this.... (ENLARGE THE FOTO!!)
It’ll take you a few tries to get it right (took me MORE than a few before I got it) but once you DO
get it, it becomes second nature.
Now, for tightening up the tucks.... I've tried several times to take pics of this but to no avail.... I
can't control the camera with my feet and I need both hands to do the work, so you'll have to be
content with a written description... forgive me....
I take the work in left hand (just like you did when you were tucking) with the lines draped over
the hand, and rotate the work clockwise until the gap appears. As you turn the work, the lines
wil drag and a definite gap will be created: use this as your starting point.
I grasp the line with my right hand and put my thumb on the work while snagging a bight of the
line between little finger and palm and rotating the hand so that the line, while being clamped
against the palm by the little finger runs out and across the outside of the little and ring
fingers. The middle finger then hooks down and acts as a tensioner while the thumb tip
against the work is your fulcrum.... tightening the middle finger toward the palm and stressing
back with the thumb will tighten the line to the work**.... now, without removing the tension,
lead the line around the work and under the index finger of the left hand and clamp with it, then
go to the next line and repeat all the above nonsense. Always work to the left and rotate the
work slightly in your hand each time you do a line. Gradually work all the way around - you’ll
probably need to do this two or three times around to get it fairly tight, but just get it fairly tight....
(**= this is very tough on the side of the first knuckle of the ring finger, since there's a lot of
stress put on it and also the line will move a bit as you tighten it up.... I suggest putting a
bandaid or some sort of chafing gear on the knuckle so as not to wear a hole in it, and I am
NOT feckin' kidding, neither!) A bloody wound will make some interesting colour variations,
especially when using cotton line. NOT good.
Now start the next row and do all the tucks and then the tugging-in for a snug fit....
(I switched to white cotton because the
nylon was proving recalcitrant and I'd only
used it for clarity. Youse lot are gettin'
coddled like I never even thought on!)
By the third pass, you should start to see a pattern emerging, as well as having the lines sitting
fairly snugly after only two passes.
Ok: Turn on the stereo or whatever and go to it.... just keep on tucking the circles and then
tightening the other way and you should have a fair amount of work finished in about an hour.
Stop. Look at the work. Is it all even? Did you have a problem with tightening up things? Is
there a line sticking out somewhere that didn't get tucked in?
The mark of a good 'over-two' hitch job is when the pattern forms completely vertical, or along
the line of the work. If it has a spiral right appearance, you have too few lines, if you have a
spiral left, too many.
PROBLEMS:
(a) there seems to be a gap in the work when I tighten up everything....
OK: at the next tuck, cut another line to length and add it in to the pattern. If you need to add
two, then add them at opposite sides. If you need to add three, you may have (censored) up
the measurements, or perhaps my formulae are suspect,
(Well, why not? I’VE been a suspect before...) so send me an email and let’s commiserate on
this.
(b) no matter how hard I try to snug them down, there’s a loose ‘lip’ to the courses when I finally
give up, like a shawl collar on a pretty blonde or they just wont snug down neatly...
Probably too MANY lines in the hitching... try dropping a few out one per course until you get a
snug fit around the work but no gaps.
(c) I missed a cord on a previous row...
Until you get used to doing this, pull out the row(s) until you get to the one where the offending
cord is, then continue the work from there. IF IT AIN’T RIGHT, GO BACK AND FIX IT AS SOON
AS YOU NOTICE IT! Otherwise you’ll have a sloppy job and you will ALWAYS know that there’s
an error right there. You’ll probably decide it needs fixing anyway, so you may as well do it
while the delay is minimal. Again, TRUST ME ON THIS!
(d) my hands are sore after about twenty minutes work....
NOT funny! Your hands WILL hurt, especially if you have landsman’s hands and skin (un-
callused) and are unused to working with small, rough line. All I can tell you is that when your
hands start to really hurt, STOP for a day. Whatever you do, you DON’T want to wear open a
raw or bleeding wound on your hands or fingers. (NOT because I like you: I could care less:
But the blood will stain the work and you’ll have to start all over again or splice in to replace the
stained section.... When I first learned to do ropework, I didn’t have the luxury of resting a day
and instead soaked my hands in a heavy brine solution (try THAT on raw skin.... makes a root
canal seem like a vacation!) until I started to get my calluses. Now, if I do two squareknot
belts, I can put a cigarette out on the side of my pinky and never feel it, but YOU don’t wanna do
that, so take it easy, allow your hands to get acclimated and if you need to, get a couple pair of
those white cotton gloves women use when doing their lingerie or handling stockings.... they’
re thin enough that you can still feel what you're doing, cheap enough that you can wear ‘em
out and throw ‘em away easily and white so they don’t dirty up your work. Kevlar sailing gloves
( minus the first joint of the fingers and thumbs) will also do the trick, but they may leave a
residue on the work and they’re HIDEOUSLY expensive. I do this all day, so I just build up the
calluses and ignore the whole thing. YMMV. CAUTION: Nylon cord, especially braided
small “mini-blind” type cord, will eat you alive in nothing flat, going thru a callus as what would
resist any type of manila or cotton ropes like the proverbial “hot knife”.... another reason I went
to white cord above!
OK. Assuming that all is going well, you should have just about covered the work in hand and
be approaching the end-point. Keep hitching until you get to one course away from where you
want to stop, then take all the lines and constrictor them to the work, put another constrictor
on the lines and then you can trim them off and that end will be ready for covering with a
turkshead or whatever you want to use to hide the end.
Now go back to the starting point and turn the work end-for end. You’ll probably have two or
three rows that just don't look as good as the rest of the work, so pull them out until you get to
the ‘good stuff” and then just start tucking again until you get to one course away from your end
point, constrictor and trim as previously and you’re finished. One of the joys of "over-two" is
that it looks the same no matter which end you may work it towards....
You CAN end this off with a footrope knot made up of the (however many) strands you used for
the hitching, but that’s a complicated project and quite easy to screw up.... try it if you’d like to.
Don’t constrictor the ends: convert from an ‘over-two’ to a simple ‘over one’ crown, do an ‘over-
one’ wall beneath it and pass it thru two or three times. It’s a pretty knot but a bugger to fair up
and get looking right.
If you’re going to varnish the hitching, now’s the time to do it, before you put on your
turksheads. You want the varnish to penetrate all the lines in the hitching, and if you apply the
turksheads and then varnish, there will be a section of line ends under the turksheads which
will remain unprotected and prone to ‘wicking’ up any water the work may be exposed to.
Promotes rot. Not good.
Also, if you've done this on a tube as shown in the photos, you CAN (although I promise you
you'll muck it up the first try!) lightly varnish the outside of the hitching, then remove the core
tube and DIP the work in varnish and allow it to dry. This will give you a hollow hitched shell of
ropework. It will NOT be strong and is prone to cracking, but for a display it is impressive: for a
workpiece, such as a needle case, leave the core in place.
If any of the above is not clear, or if you think there’s a mistake, go HERE and get a T.S. chit for
the Chaplain’s office. I’m done wi’ ye!
| "OVER-TWO" Fender Hitching Vince Brennan, RWG, SOSKA |

| Last updated 2017-04-07 |
| Click on any picture to bring up a larger verzion! |


finished row
As always with ANY of
the tutorials, if you feel
you can clarify or
improve the exposition
in any way, please feel
free to contact me,
especially if you can do
better pictures (a
groundhog could do
better pictures!) than I!
the tutorials, if you feel
you can clarify or
improve the exposition
in any way, please feel
free to contact me,
especially if you can do
better pictures (a
groundhog could do
better pictures!) than I!