| SIMPLE GRAFTING Vince Brennan TDGNFD |

| Last updated 12-28-20166 |
| Click on any picture to bring up a larger verzion! |
SIMPLE GRAFTING: Doing it " by hand" method... (Sorry Sister Mary Gertrude...)
This is a very pretty finish for just about any cylindrical object: Looms on oars, certain splices in
line, around a mast, on a pipe-stem in sailtwine, on a needlecase, or a bellrope, the uses are
endless. It is intended to provide a protective cover for something that would ordinarily become
chafed with usage or to ‘fatten up’ a detail like the gripe on a ditty-bag lanyard.
It is a labour-intensive job and requires concentration and attention to keep it running smoothly,
but that’s the most difficult part of the whole thing.
The WARP is the long line which will circle the work and separate the WEFTS into an up-and-down
pattern
Determine what size line you will be using for the warp line... I recommend a line about 1/4 the size
of the wefts if you’re using a larger size line for them (if you're covering a large object) but for
smaller lines where you’ll be using say a 1/8” or 3/16” line, then DUCKWORKS has a nice
unwaxed sailtwine in white which does the trick for me quite nicely.... if you’re doing this on
something small like the letter-opener, then Coats & Clark’s Heavy-Duty Button thread is a good
choice.
To start, you will want to cut as many lines as will tightly fit around the object to be covered without
their ‘bulging’ out.... and you must always remember that you want an ODD number of lines so that
the progression of over-one under-one will continue around the work. giving you the alternating
pattern so typical of grafting.
For small work, allow about 1.5:1 for the weft lines and a bit more for larger work, since the bend
over the warp will be more acute and use a bit more line.
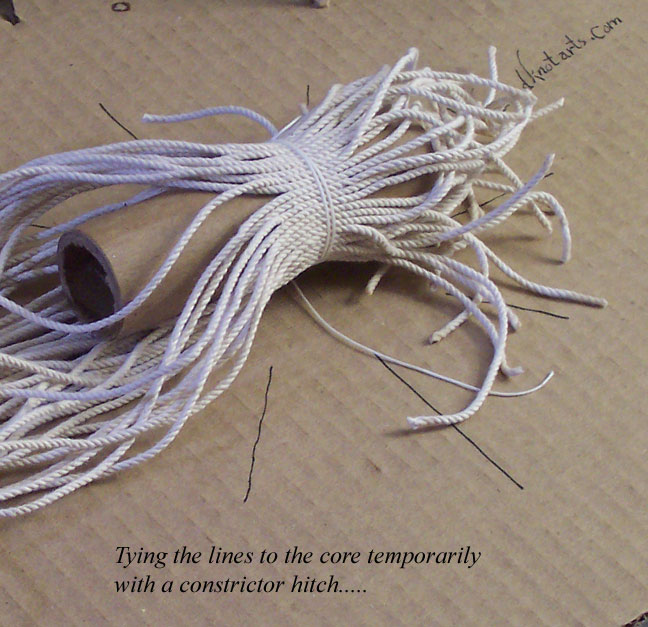
Lay up your lines under a loose constrictor hitch to be sure you have enough (as I said) to cover the
work completely but not “bulge” over each other.
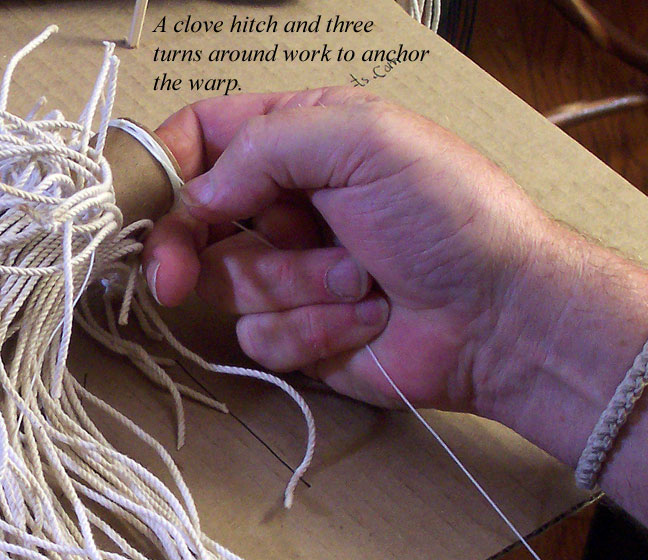
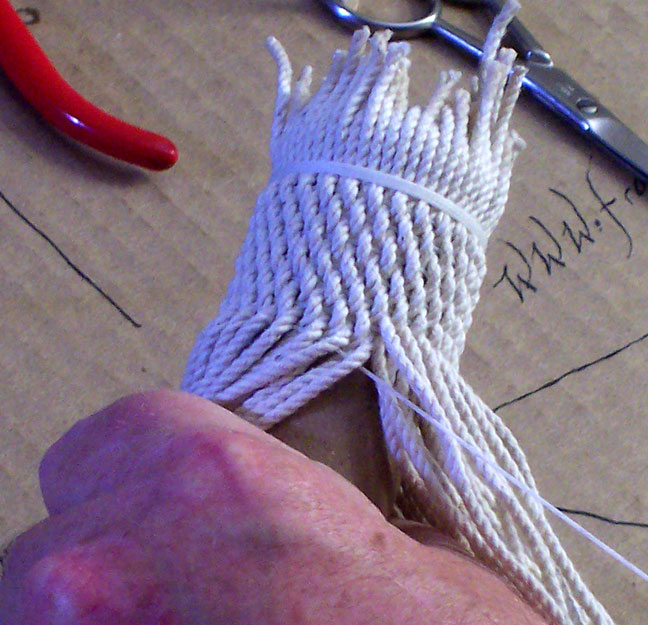
Fold the upper lines back out of the way and make up your warpline to the work with a constrictor
hitch... wrap your warp line around the work at least a few times to ensure it doesn’t slip on you.
Despite my advice above, this is a WAXED sailtwine.
(Because it's what I had on hand, that's why....)
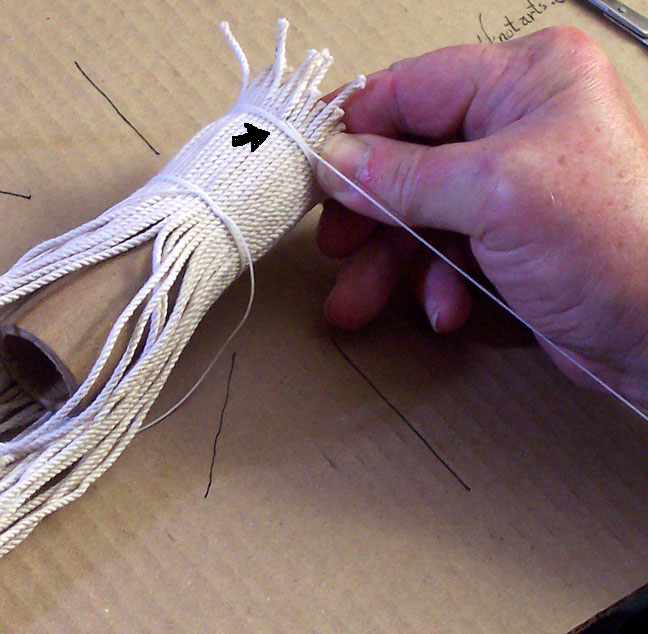
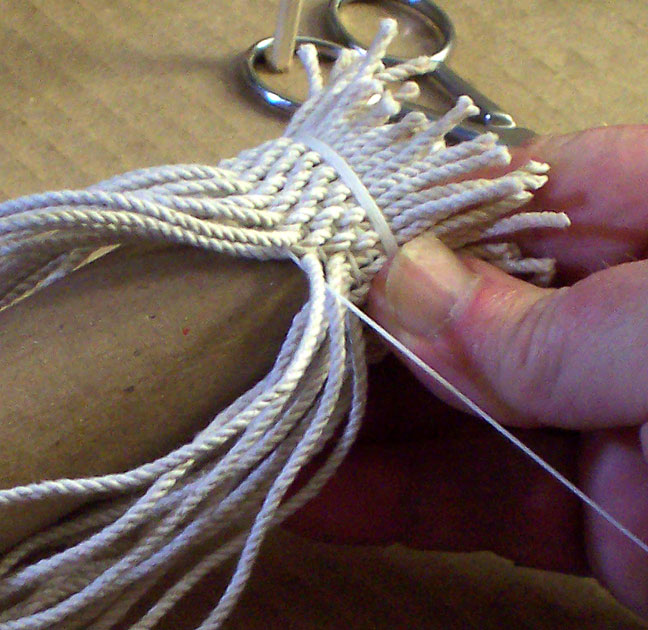
Bring your warp up between any two wefts and then wrap tightly for four turns OVER EVERYTHING.
Ensure that all the wefts are neatly alongside one another as they're being wrapped... Now you
can remove the constrictor knot around the work as the warpline is now securing the wefts in place.
Once you’ve done that, you’re ready to start grafting .
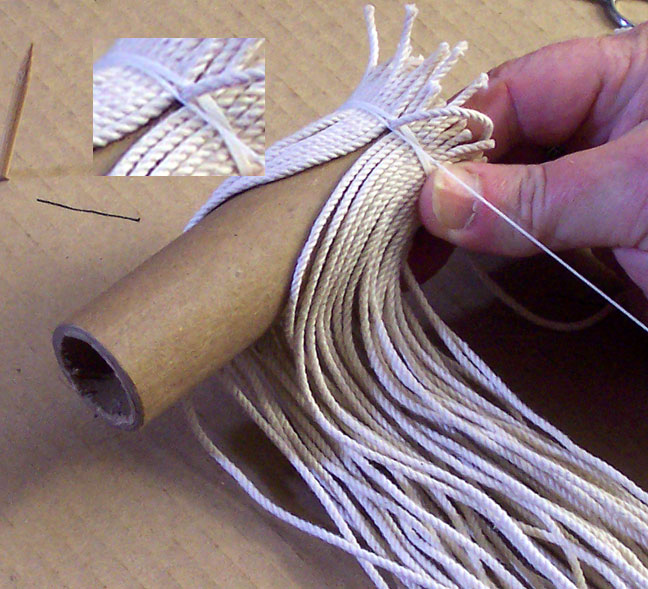
Take the next weft from where your warpline appears and pass the warp over it, then pass the warp
under the next weft, over the next weft and so on, holding the work in your left hand and slowly
rotating it AWAY from you as you continue to pass the warp either over or under the wefts. Keep a
hard tension on the warpline as you’re doing this. (I sit while I’m doing it and I lead the warp under
my right arm and around my body once, across my lap from left to right and then UNDER me arse
from right to left as I sit... the spool of line I’m using for the warp usually sits on the floor beside my
left foot. This allows me to ‘feed” line as required just by raising up a bit and pulling out on the left
hand.... when I’ve got enough line to work with, I sit back down and the line is clamped. It works
well for me.
As you’re going around the work, be sure you pay attention to the progression of over and under... it’
s very easy to get two wefts under and not notice it, and you won’t see the error until you’ve come all
the way around again.... be advised, you WILL do it and you WILL be frustrated, but it’s the price
you pay for pretty ropework. Just reverse the rotation of the work and remove lines as you go,
keeping tension on the warp, until you come to the error and correct it.
That’s all there is to grafting. Keep the over and under pattern going, and going, and going.....
Again, the main problem with grafting is the boredom of “Over, Under, Over, Under, Over....” but the
end result is striking and worth the time....
The work progresses quickly, but this piece has 55 wefts and it takes about five minutes to do one
pass, so... Just keep it going... and going... and...
TAKE BREAKS! Your hands will thank you!
(Speaking of "going... and going... and...") I'm no longer young and I have a wicked case of T.B.
(Tiny Bladder), so I know I'm not gonna get thru an entire job at one shot.... the solution is to stop
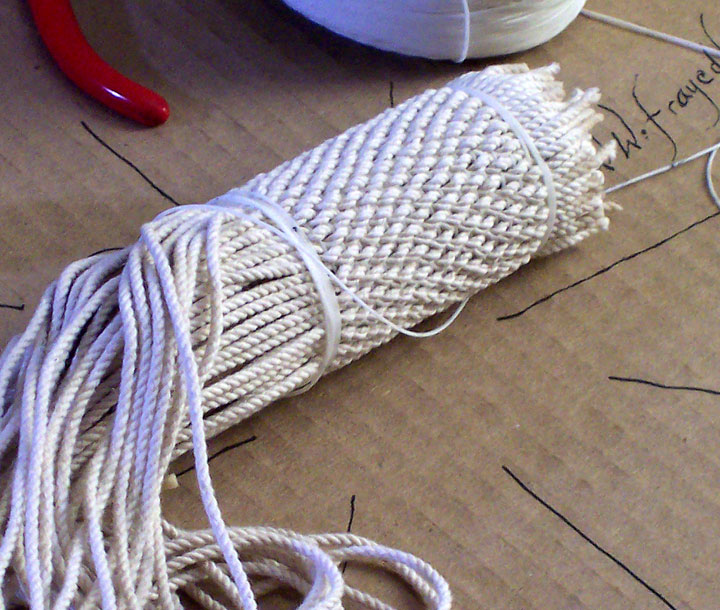
the "over/under" pattern and go to an "all-over" pattern, NEATLY wrapping the entire work about four
or five times and then just putting it down where it won't be disturbed: string tension will hold the
work in place until you've pumped bilges.
Whe you return, re-arrange your warp line for tension (i.e.: "Sit on it !") ; rotate the work toward you
while taking up the warpline until you reach the place where you stopped and just continue from
that point. (Ahhhh.... the pause that refreshes!)
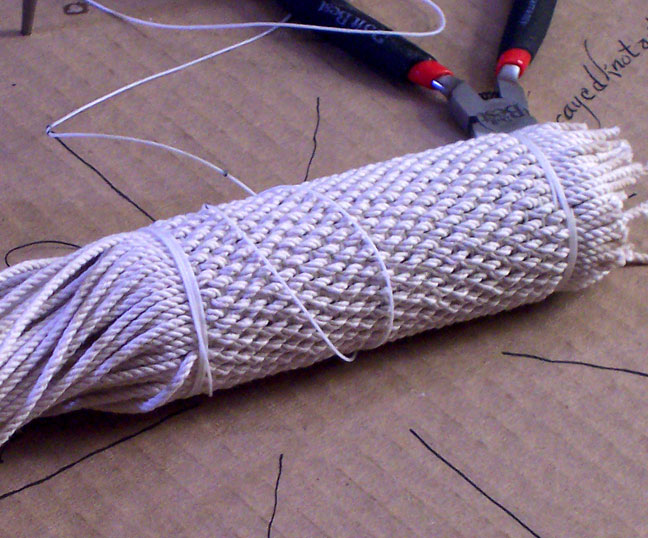
Once you get to the end (about 1/4" from the end of the work), wrap the work neatly overall and then
put on four more turns.
At this point you may either take a VERY sharp kife or a utility blade and cut off the excess lines
using the warp as a guide (be VERY CAREFUL NOT to cut the WARP line here!) and then wrap the
core of the work four times and finish with a constrictor or two half-hitches.... Or you can part the
wefts and lead the warp under them, wrap the core and finish with a constrictor / half-hitches and
THEN cut the excess weft-lines. I favour the former method.... but getting used to the latter is a
necessity, as you must now trim off the other end. Again, be VERY CAREFUL NOT to cut the warp
line or the bloody thing becomes a major problem. (a.k.a. "spaghetti")
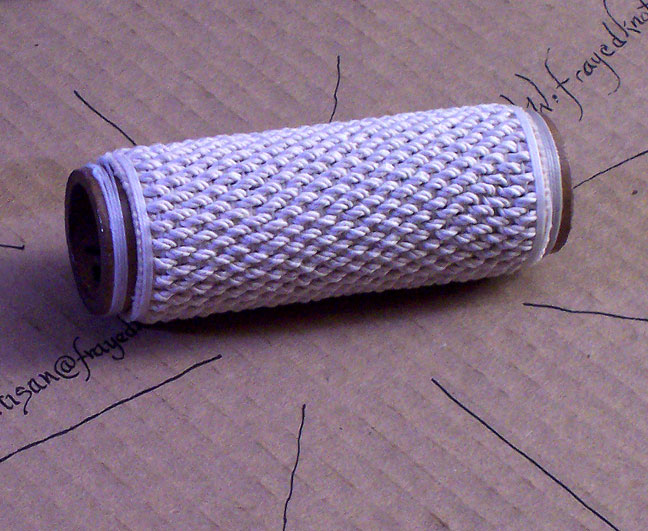
Two shots of the finished work: wrapped, cut and then varnished
over on the ends ONLY. Use a small brush and be sure you keep
the (varnish)(glue)(snot) OFF of the grafting unless you're going
to do the whole work. It WILL change the colour of the line!
Bingo! Grafting! It's a bitch to do, but only because of the boredom.
Finish the ends with turksheads, make stoppers out of corks or construct
a stopper from larger line (1/8") making a seven or eight point star knot.
See the linked page..
This needle case is 1.3" I.D. and about 5" long.
Est. time for a pro is 4 hours, for an advanced knottyer, 6 hours and for
a novice you should allow 8-10 hours and two bottles of Irish Whisky over
two days sitting. (It takes me three days to do one up, but I just
learned "Bye-Bye" and am still having trouble with "Patty-Cake", so....)
Thanks for listening and not throwing shellfish at me.
IF YOU CAME HERE FROM THE BELLROPE TUTORIAL, CLICK HERE TO RETURN, OR USE
YOUR BROWSER'S "BACK" BUTTON.
Otherwise, go explore!
Below is a piece made from these instructions by Jonathan FRINGS, of Aruba.
This is a very pretty finish for just about any cylindrical object: Looms on oars, certain splices in
line, around a mast, on a pipe-stem in sailtwine, on a needlecase, or a bellrope, the uses are
endless. It is intended to provide a protective cover for something that would ordinarily become
chafed with usage or to ‘fatten up’ a detail like the gripe on a ditty-bag lanyard.
It is a labour-intensive job and requires concentration and attention to keep it running smoothly,
but that’s the most difficult part of the whole thing.
The WARP is the long line which will circle the work and separate the WEFTS into an up-and-down
pattern
Determine what size line you will be using for the warp line... I recommend a line about 1/4 the size
of the wefts if you’re using a larger size line for them (if you're covering a large object) but for
smaller lines where you’ll be using say a 1/8” or 3/16” line, then DUCKWORKS has a nice
unwaxed sailtwine in white which does the trick for me quite nicely.... if you’re doing this on
something small like the letter-opener, then Coats & Clark’s Heavy-Duty Button thread is a good
choice.
To start, you will want to cut as many lines as will tightly fit around the object to be covered without
their ‘bulging’ out.... and you must always remember that you want an ODD number of lines so that
the progression of over-one under-one will continue around the work. giving you the alternating
pattern so typical of grafting.
For small work, allow about 1.5:1 for the weft lines and a bit more for larger work, since the bend
over the warp will be more acute and use a bit more line.
Lay up your lines under a loose constrictor hitch to be sure you have enough (as I said) to cover the
work completely but not “bulge” over each other.
Fold the upper lines back out of the way and make up your warpline to the work with a constrictor
hitch... wrap your warp line around the work at least a few times to ensure it doesn’t slip on you.
Despite my advice above, this is a WAXED sailtwine.
(Because it's what I had on hand, that's why....)
Bring your warp up between any two wefts and then wrap tightly for four turns OVER EVERYTHING.
Ensure that all the wefts are neatly alongside one another as they're being wrapped... Now you
can remove the constrictor knot around the work as the warpline is now securing the wefts in place.
Once you’ve done that, you’re ready to start grafting .
Take the next weft from where your warpline appears and pass the warp over it, then pass the warp
under the next weft, over the next weft and so on, holding the work in your left hand and slowly
rotating it AWAY from you as you continue to pass the warp either over or under the wefts. Keep a
hard tension on the warpline as you’re doing this. (I sit while I’m doing it and I lead the warp under
my right arm and around my body once, across my lap from left to right and then UNDER me arse
from right to left as I sit... the spool of line I’m using for the warp usually sits on the floor beside my
left foot. This allows me to ‘feed” line as required just by raising up a bit and pulling out on the left
hand.... when I’ve got enough line to work with, I sit back down and the line is clamped. It works
well for me.
As you’re going around the work, be sure you pay attention to the progression of over and under... it’
s very easy to get two wefts under and not notice it, and you won’t see the error until you’ve come all
the way around again.... be advised, you WILL do it and you WILL be frustrated, but it’s the price
you pay for pretty ropework. Just reverse the rotation of the work and remove lines as you go,
keeping tension on the warp, until you come to the error and correct it.
That’s all there is to grafting. Keep the over and under pattern going, and going, and going.....
Again, the main problem with grafting is the boredom of “Over, Under, Over, Under, Over....” but the
end result is striking and worth the time....
The work progresses quickly, but this piece has 55 wefts and it takes about five minutes to do one
pass, so... Just keep it going... and going... and...
TAKE BREAKS! Your hands will thank you!
(Speaking of "going... and going... and...") I'm no longer young and I have a wicked case of T.B.
(Tiny Bladder), so I know I'm not gonna get thru an entire job at one shot.... the solution is to stop
the "over/under" pattern and go to an "all-over" pattern, NEATLY wrapping the entire work about four
or five times and then just putting it down where it won't be disturbed: string tension will hold the
work in place until you've pumped bilges.
Whe you return, re-arrange your warp line for tension (i.e.: "Sit on it !") ; rotate the work toward you
while taking up the warpline until you reach the place where you stopped and just continue from
that point. (Ahhhh.... the pause that refreshes!)
Once you get to the end (about 1/4" from the end of the work), wrap the work neatly overall and then
put on four more turns.
At this point you may either take a VERY sharp kife or a utility blade and cut off the excess lines
using the warp as a guide (be VERY CAREFUL NOT to cut the WARP line here!) and then wrap the
core of the work four times and finish with a constrictor or two half-hitches.... Or you can part the
wefts and lead the warp under them, wrap the core and finish with a constrictor / half-hitches and
THEN cut the excess weft-lines. I favour the former method.... but getting used to the latter is a
necessity, as you must now trim off the other end. Again, be VERY CAREFUL NOT to cut the warp
line or the bloody thing becomes a major problem. (a.k.a. "spaghetti")
Two shots of the finished work: wrapped, cut and then varnished
over on the ends ONLY. Use a small brush and be sure you keep
the (varnish)(glue)(snot) OFF of the grafting unless you're going
to do the whole work. It WILL change the colour of the line!
Bingo! Grafting! It's a bitch to do, but only because of the boredom.
Finish the ends with turksheads, make stoppers out of corks or construct
a stopper from larger line (1/8") making a seven or eight point star knot.
See the linked page..
This needle case is 1.3" I.D. and about 5" long.
Est. time for a pro is 4 hours, for an advanced knottyer, 6 hours and for
a novice you should allow 8-10 hours and two bottles of Irish Whisky over
two days sitting. (It takes me three days to do one up, but I just
learned "Bye-Bye" and am still having trouble with "Patty-Cake", so....)
Thanks for listening and not throwing shellfish at me.
IF YOU CAME HERE FROM THE BELLROPE TUTORIAL, CLICK HERE TO RETURN, OR USE
YOUR BROWSER'S "BACK" BUTTON.
Otherwise, go explore!
Below is a piece made from these instructions by Jonathan FRINGS, of Aruba.


As always with ANY of the tutorials, if you feel you can clarify or improve the exposition in any way, please feel free to contact me,
especially if you can do better pictures (a groundhog could do better pictures!) than I!
especially if you can do better pictures (a groundhog could do better pictures!) than I!

