For a long time, I wasn't even sure that polyester could even BE rat-tailed. I could do them with no problem on natural cordage, but my
polyester experiments were miserable fuzz-blob failures not worth talking about. I also couldn't find any pictures of a successful one,
had never seen one come in on a sail needing repair or any hard evidence that anybody was actually doing them.
It looked like my options were the following:
(1) Mix synthetic fabric with natural cordage roping (not a great idea in my opinion),
(2) Just hot-cut the roping and have a blunt end where it stopped (ugly and probably also not a great idea from a stress
concentration point of view),
(3) Cut the rope blunt, but cover it's end with a little Dacron flap (I'd seen this done and though it looks a bit better, it's
certainly not elegant and again, stress concentration might be a problem where the sail's edge transitioned instantly
from rope-reinforced to bare Dacron),
(4) Hot cut a taper in the rope (this was suggested in one of my sailmaking books - it looks horrible and the rope ends up
very weak in spots), OR:
(5) Sit down and figure out how to rat-tail the stuff properly, taking as long as it takes to get it right, or just don't offer
this type of roping as an option on sails!
It took a while, but I did figure out how to do it and this is how:
First, get the right kind of rope. I use New England's "Filament" Dacron 3-strand, not the fuzzy "Spun-Dacron" version. Filament Dacron
looks better and works with the staining method that I use if I want to make natural-colored rope. The spun stuff won't take stain and
I've never tried to rat-tail it, so I can't tell you if it can be done. I also haven't had the need to try it on other brands of rope, so I can't say
whether or not it will work.
Tools: You'll need the TODDCO rope rat-tailing kit - consisting of:
.....one piece, thin wood
.....one utility knife blade, fresh
.....Two spring clamps
.....one small block of beeswax
($49.95 or three payments of just $19.95 on your credit card, plus $18.95 shipping and handling. Order before midnight tonight and we'll throw in a
second kit absolutely free! Call now at 1-800 IMA-FOOL to take advantage of this incredible offer - operators are standing by...)
Step#1 - Stop-off The rope by wrapping it with tape 8"-12" from the end. It takes some practice to figure out just how far from the
stop-off point your typical, finished rat-tail will end, but you can worry about that later as you get the hang of making them. Cleanly unlay
one strand from the other two (leave them alone for now). Unlay the loose strand until you're down to small individual yarn bundles
about 1/16" in diameter. Different sizes of rope have differing numbers of these little bundles. You don't need individual fibers, but you
do need these small-diameter groups of them.
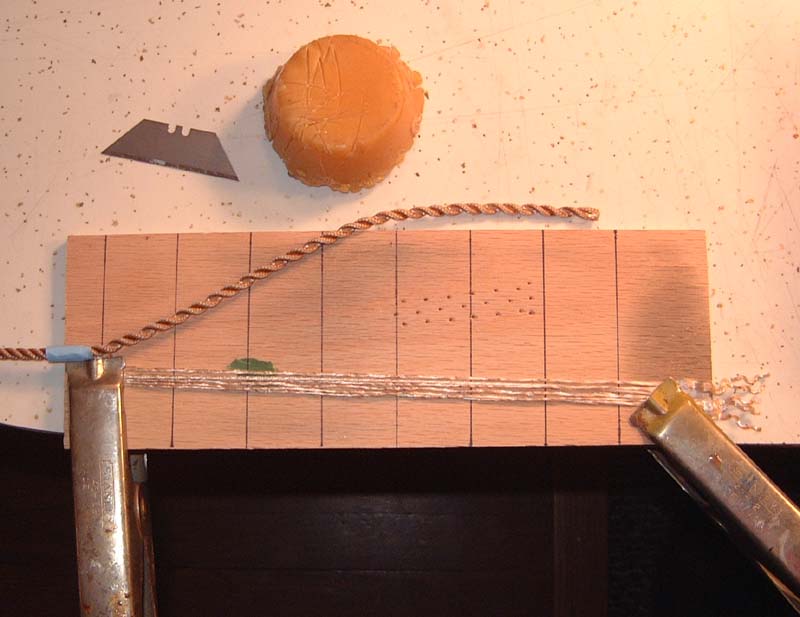
Step #2 - Prepare the board. It helped me at first to draw lines across the board at regular intervals as a rough guide for scraping.
After a while, you don't need them, but they help. Clamp the rope down on the board at or near the stopped-off spot. Then lay the loose
strands out flat, even and parallel and clamp down their loose ends as shown in this photo (nice looking kit, huh? Real oak!).
The strands are curly and will resist, so combing them out straight and getting their loose ends clamped down is a bit of a challenge,
but keep at it until they're nice and neat.
Step#3 - Scraping. Begin up near the stop-off clamp, hold the blade straight up and down and crosswise to the strands and with
light-to-moderate pressure, scrape all the way down until you come to the far end at the other clamp. For the second pass, start at the
first line past the stop-off clamp and go all the way down. With each new stroke, you move down one line, making a slightly shorter
pass, but going all the way to the end. Fuzz blobs will start to show up at the end as you can see here.
Continue repeating this graduated scraping process. A lot of light strokes are much better than trying to do it quickly with a few heavy
strokes. You will find with practice that the ideal scraping pattern tends to be thinning fairly dramatically very soon, up near the stop-off
point, followed by a longer, more even taper as you approach the loose ends. This is because, try as you will, it's very tough to re-wind
the strands and get them as tight and smooth as they originally were. To avoid a bulge on the finished rope, right where you started
rat-tailing, you need to reduce the strand diameters somewhat quickly at first.
Continue scraping, eyeballing for uneven spots and correct them as needed. Scrape until the strands finally taper-out at the bottom
end and are free from the second clamp. You may get some small fuzz-blobs which form mid-stream and don't want to move all the
way down to the pile at the bottom. This happens. You can either try to scrape them down, or actually cut them out. Just do it bofore
they get too big. You can afford to lose a little volume here and there - as long as you're not cutting out a huge blob right in the middle
of what's supposed to be an even taper. Here again, scraping with lots of light strokes tends to do a better job and produces fewer of
these misplaced fuzz clinkers. Photo of finished scraping:
Step#4 - Waxing. Leave the line clamped to the board and start rubbing the strands with wax. Use straight strokes, starting up at the
top. Don't skimp on wax. It should look like this:
Once the strands are well waxed, unclamp the rope from the board, flip it over and wax the back side of the strands.
Step#5 - In the words of the immortal Chubby Checker....C'mon Baby, Let's do the Twist!
Pinch the waxed strands, right at the tape with one hand and about 1/4"-1/2" down the strands with the other hand. Start twisting the
waxy yarns in the same direction that they were originally twisted. Twist them fairly tightly and begin moving both pinch points down
the strand a little bit at a time, while twisting. If needed, you can rub more wax on them any time if they're not sticking together well.
When finished, you should get a nice tapered strand. If it's not, untwist it and start over. Sometimes the second effort yields a
smoother, tighter strand. The finished strand should look like this:
Step#6 - Now twist your tapered strand back into the other two main strands. You may need to tighten or ease it's twist a bit in spots
along the way to get it to blend in with the lay of the rope, but in general try to keep a nice firm twist to it. It will end short of the other two,
but that's OK for now. Once it's back in place, it will look like this:
Now that one strand is done, you unwind one of the two remaining original strands and repeat the tapering/waxing/twisting process.
Wind that strand in with it's mates when it's done. Then do the same process with the final main strand. When finished, you will have
a rat-tail. If you're making a tapered eye-splice instead of a rat-tail, you taper, wax and twist-up the three main
strands and then start making your splicing tucks, just as you would with un-tapered strands.
It takes me about a half hour to rat-tail 3/16" or 1/4" line. Thicker stuff takes longer because it contains a lot more of those small fiber
bundles, but the process is the same. I did also try rat-tailing by very carefully stair-step cutting the little bundles with scissors, rather
than scraping the taper into the strands. It more-or-less worked, but was prone to the small cut ends of the strands showing up on the
surface during twisting and poking out, so I stuck with scraping. If the rope has been stained, it will probably need a bit of color
touch-up on the rat-tail once it's done. I use more stain and a tiny brush to cover anything that needs it. The original staining doesn't
always penetrate all the way to the core, so re-twisting sometimes brings some white, unstained strands to the surface. The oil stain
and wax seem to get along pretty well and after drying for a couple days the stuff won't come off on other parts of the sail or your hands.
Finished rat tails seem to hold up pretty well. The one shown in my first post on this thread (with the luff tapes) was a test-tail on the
end of a rope that's been out in the garden for a couple years holding up a post. It doesn't seem to be trying to unwind and once
they're sewn to a sail or made into a tapered splice, they should do just fine.
(Todd Bradshaw is a professional sailmaker and the author/illustrator of "Canoe Rig: The Essence And The Art" from Wooden
Boat Publications. He tortures canvas and other fabrics at his business, "Addiction Sailmakers," in Madison, WI, when not
totally confusing people on The Wooden Boat Forum, and we thank him extravagantly for the use of his excellent article here. )
polyester experiments were miserable fuzz-blob failures not worth talking about. I also couldn't find any pictures of a successful one,
had never seen one come in on a sail needing repair or any hard evidence that anybody was actually doing them.
It looked like my options were the following:
(1) Mix synthetic fabric with natural cordage roping (not a great idea in my opinion),
(2) Just hot-cut the roping and have a blunt end where it stopped (ugly and probably also not a great idea from a stress
concentration point of view),
(3) Cut the rope blunt, but cover it's end with a little Dacron flap (I'd seen this done and though it looks a bit better, it's
certainly not elegant and again, stress concentration might be a problem where the sail's edge transitioned instantly
from rope-reinforced to bare Dacron),
(4) Hot cut a taper in the rope (this was suggested in one of my sailmaking books - it looks horrible and the rope ends up
very weak in spots), OR:
(5) Sit down and figure out how to rat-tail the stuff properly, taking as long as it takes to get it right, or just don't offer
this type of roping as an option on sails!
It took a while, but I did figure out how to do it and this is how:
First, get the right kind of rope. I use New England's "Filament" Dacron 3-strand, not the fuzzy "Spun-Dacron" version. Filament Dacron
looks better and works with the staining method that I use if I want to make natural-colored rope. The spun stuff won't take stain and
I've never tried to rat-tail it, so I can't tell you if it can be done. I also haven't had the need to try it on other brands of rope, so I can't say
whether or not it will work.
Tools: You'll need the TODDCO rope rat-tailing kit - consisting of:
.....one piece, thin wood
.....one utility knife blade, fresh
.....Two spring clamps
.....one small block of beeswax
($49.95 or three payments of just $19.95 on your credit card, plus $18.95 shipping and handling. Order before midnight tonight and we'll throw in a
second kit absolutely free! Call now at 1-800 IMA-FOOL to take advantage of this incredible offer - operators are standing by...)
Step#1 - Stop-off The rope by wrapping it with tape 8"-12" from the end. It takes some practice to figure out just how far from the
stop-off point your typical, finished rat-tail will end, but you can worry about that later as you get the hang of making them. Cleanly unlay
one strand from the other two (leave them alone for now). Unlay the loose strand until you're down to small individual yarn bundles
about 1/16" in diameter. Different sizes of rope have differing numbers of these little bundles. You don't need individual fibers, but you
do need these small-diameter groups of them.
Step #2 - Prepare the board. It helped me at first to draw lines across the board at regular intervals as a rough guide for scraping.
After a while, you don't need them, but they help. Clamp the rope down on the board at or near the stopped-off spot. Then lay the loose
strands out flat, even and parallel and clamp down their loose ends as shown in this photo (nice looking kit, huh? Real oak!).
The strands are curly and will resist, so combing them out straight and getting their loose ends clamped down is a bit of a challenge,
but keep at it until they're nice and neat.
Step#3 - Scraping. Begin up near the stop-off clamp, hold the blade straight up and down and crosswise to the strands and with
light-to-moderate pressure, scrape all the way down until you come to the far end at the other clamp. For the second pass, start at the
first line past the stop-off clamp and go all the way down. With each new stroke, you move down one line, making a slightly shorter
pass, but going all the way to the end. Fuzz blobs will start to show up at the end as you can see here.
Continue repeating this graduated scraping process. A lot of light strokes are much better than trying to do it quickly with a few heavy
strokes. You will find with practice that the ideal scraping pattern tends to be thinning fairly dramatically very soon, up near the stop-off
point, followed by a longer, more even taper as you approach the loose ends. This is because, try as you will, it's very tough to re-wind
the strands and get them as tight and smooth as they originally were. To avoid a bulge on the finished rope, right where you started
rat-tailing, you need to reduce the strand diameters somewhat quickly at first.
Continue scraping, eyeballing for uneven spots and correct them as needed. Scrape until the strands finally taper-out at the bottom
end and are free from the second clamp. You may get some small fuzz-blobs which form mid-stream and don't want to move all the
way down to the pile at the bottom. This happens. You can either try to scrape them down, or actually cut them out. Just do it bofore
they get too big. You can afford to lose a little volume here and there - as long as you're not cutting out a huge blob right in the middle
of what's supposed to be an even taper. Here again, scraping with lots of light strokes tends to do a better job and produces fewer of
these misplaced fuzz clinkers. Photo of finished scraping:
Step#4 - Waxing. Leave the line clamped to the board and start rubbing the strands with wax. Use straight strokes, starting up at the
top. Don't skimp on wax. It should look like this:
Once the strands are well waxed, unclamp the rope from the board, flip it over and wax the back side of the strands.
Step#5 - In the words of the immortal Chubby Checker....C'mon Baby, Let's do the Twist!
Pinch the waxed strands, right at the tape with one hand and about 1/4"-1/2" down the strands with the other hand. Start twisting the
waxy yarns in the same direction that they were originally twisted. Twist them fairly tightly and begin moving both pinch points down
the strand a little bit at a time, while twisting. If needed, you can rub more wax on them any time if they're not sticking together well.
When finished, you should get a nice tapered strand. If it's not, untwist it and start over. Sometimes the second effort yields a
smoother, tighter strand. The finished strand should look like this:
Step#6 - Now twist your tapered strand back into the other two main strands. You may need to tighten or ease it's twist a bit in spots
along the way to get it to blend in with the lay of the rope, but in general try to keep a nice firm twist to it. It will end short of the other two,
but that's OK for now. Once it's back in place, it will look like this:
Now that one strand is done, you unwind one of the two remaining original strands and repeat the tapering/waxing/twisting process.
Wind that strand in with it's mates when it's done. Then do the same process with the final main strand. When finished, you will have
a rat-tail. If you're making a tapered eye-splice instead of a rat-tail, you taper, wax and twist-up the three main
strands and then start making your splicing tucks, just as you would with un-tapered strands.
It takes me about a half hour to rat-tail 3/16" or 1/4" line. Thicker stuff takes longer because it contains a lot more of those small fiber
bundles, but the process is the same. I did also try rat-tailing by very carefully stair-step cutting the little bundles with scissors, rather
than scraping the taper into the strands. It more-or-less worked, but was prone to the small cut ends of the strands showing up on the
surface during twisting and poking out, so I stuck with scraping. If the rope has been stained, it will probably need a bit of color
touch-up on the rat-tail once it's done. I use more stain and a tiny brush to cover anything that needs it. The original staining doesn't
always penetrate all the way to the core, so re-twisting sometimes brings some white, unstained strands to the surface. The oil stain
and wax seem to get along pretty well and after drying for a couple days the stuff won't come off on other parts of the sail or your hands.
Finished rat tails seem to hold up pretty well. The one shown in my first post on this thread (with the luff tapes) was a test-tail on the
end of a rope that's been out in the garden for a couple years holding up a post. It doesn't seem to be trying to unwind and once
they're sewn to a sail or made into a tapered splice, they should do just fine.
(Todd Bradshaw is a professional sailmaker and the author/illustrator of "Canoe Rig: The Essence And The Art" from Wooden
Boat Publications. He tortures canvas and other fabrics at his business, "Addiction Sailmakers," in Madison, WI, when not
totally confusing people on The Wooden Boat Forum, and we thank him extravagantly for the use of his excellent article here. )
| RATTAILING in POLYESTER or NYLON an article by TODD BRADSHAW (following six paragraphs of MY drivel....) |
| ~~~~~~~~~~~~~~~~~~~~~~~~~~~~~~~~~~~~~~~~~~~~~~~~~~~~~~~~~~~~~~~~~~ |

| Click on ANY picture to see a larger version: Small pictures here are to allow dial-up customers easy access |
| Last updated 2006-11-26 |
| ~~~~~~~~~~~~~~~~~~~~~~~~~~~~~~~~~~~~~~~~~~~~~~~~~~~~~~~~~~~~~~~~~~ |
| ~~~~~~~~~~~~~~~~~~~~~~~~~~~~~~~~~~~~~~~~~~~~~~~~~~~~~~~~~~~~~~~~~~ |
"Rat-tailing" refers to the act of tapering the end of a line so as:
(1) allow it to be short-spliced while not increasing the diameter of the
line spliced beyond the original,
(2) to be covered with a linen "coat" so as to then form a decorative
"knob" knot, as in a chest becket's axle ends or anyplace else that a
hard-wearing and highly-finished appearance is desired. (In the example
to the right, not only the knob-knots were covered with linen, but the entire
coachwhipped bail was also 'jacketed' and the ends given a long taper
preparatory to being ringbolt hitched around the axles.)
(3) for use as a leech-line or bolt-rope in sailmaking,
(4) to form the tapered "Sailmaker's Eyesplice".
This is fairly easy to do in manila line, as the fibers "behave" themselves,
but in Nylon or any synthetic line, the fibres, once released from the tension
of being laid up into rope are wont to just get totally unmanageable when
trying to taper them for the above purposes.
Todd Bradshaw sat and thought long and hard about this and finally decided to take pity of us poor "carrot makers" with the
following MOST EXCELLENT tutorial. Bear in mind that Todd is a sailmaker and in the following article he is talking about roping
a sail.... the principle is the same for ANY polyester rattailing...


© 2006 Addiction Sailmakers
© 2006 Addiction Sailmakers
© 2006 Addiction Sailmakers
© 2006 Addiction Sailmakers
© 2006 Addiction Sailmakers
© 2006 Addiction Sailmakers