| THE TURKS HEAD CROSS By CHRIS BENCO |

| Last updated 2008-07-08 |
| Click on any picture to bring up a larger verzion! |
Ashley's Book Of Knots has many specialized knots and Chris Benco (ChrisBen at the WBF) has made up a photo
tutorial for us on making one. It's a daunting task but, like most knots, is easily understood by taking it one step at
a time. This is NOT a knot that wil find everyday use for most people, but as a slider on a lanyard or (in larger rope
sizes) as an altar decoration, it is unequalled in it's impressiveness.
Be prepared to spend quite some time on this at first... the result is more than worth the investment!
Thanks to Chris for taking the time to do this up and send it.
As always, if you have any questions, just EMAIL me and if you have a particular favourite knot or sennit you'd like
to show off or if you'd care to tackle one of these photo-tutorials, let me know!

The long and the short of it. The larger cross used 150' of 1/4" tarred line and took about 60 hours to make and fair up. At six passes,
I think I'd have gone a bit psychotic... a truly superb piece of knotwork!
Something about Chris:
" I grew up in my fathers sail loft, he owned 'Yardarm Sailmakers' in Needham, Ma. from 1960-1987, doing mostly traditional
handworked sails for east coast schooners and many square riggers, even using traditional flax material for some.
He also taught me the awning trade and I went into that business myself. I also dabble in wood working and have built 4 small sail
boats and a canoe over the years."
Chris now lives in Florida and is semi-retired.
The work:
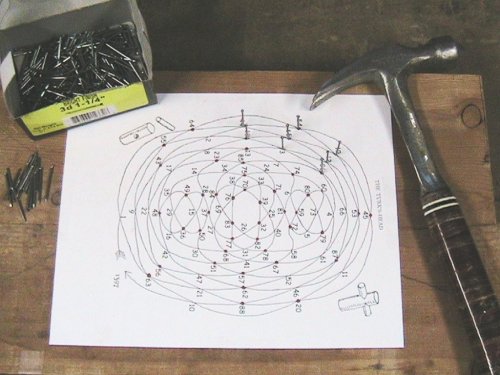
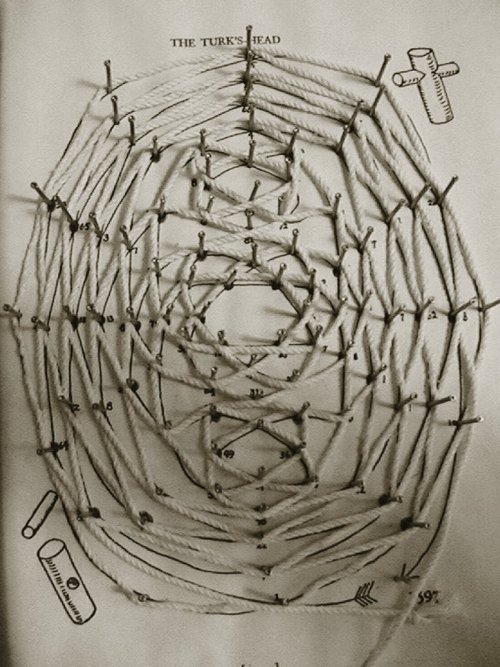
First, DOWNLOAD the chart seen to the right, which is the
pattern for the Turkshead Cross from ABOK (1397).
Print out the turkshead cross pattern at 8 1/2" x 11"
Tape the sheet onto a 1" thick x 10" wide x 12" or 14" long piece
of pine. (ed: If you plan on making a lot of these, leave an
extra inch or so on top, place the pattern off-center vertically and
drill a hole along the top of the board to hang for storage!)
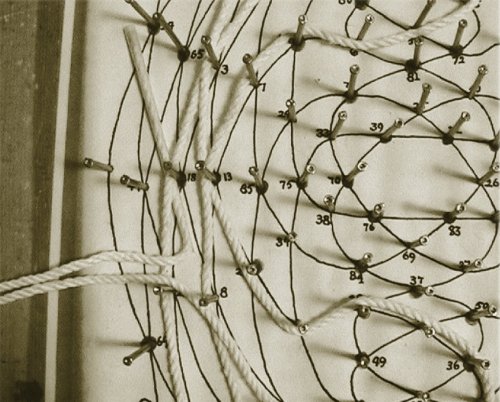
Use 3D 1 1/4" finish nails and put one at every crossing point
(fig. 1)
( For you right handers, start at the upper right and work down to
the lower left, opposite direction for the lefties: fewer bashed
fingers this way! )
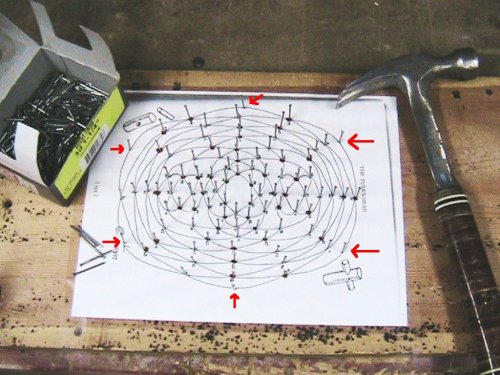
Once you've finished, put in a nail at the apex of the outer lines
as well (fig. 2 red arrows).
To start off I'll be using some 1/8" x 3 strand cotton twine. It's
best to use something small to start as the knot gets a bit
crowded otherwise. You'll need at least 20' to go all the way
around the board.
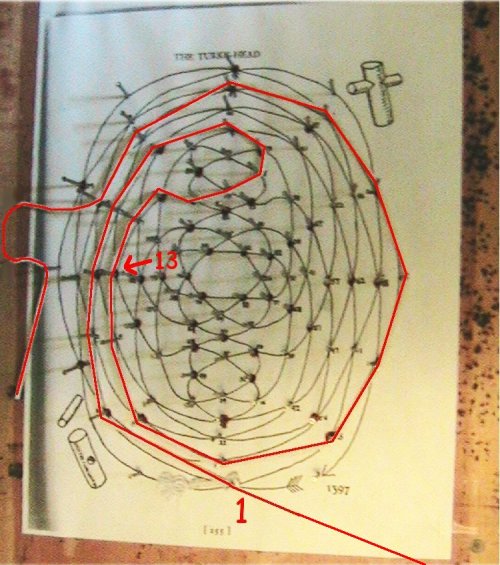
Tie a slip knot at one end and put it around the #1 pin. Work your
way around following the numbers. (fig. 3)
When you reach #13 you'll come to the first crossing with a dot.
Tuck your end under (fig. 4).
(As Chris forgot to put in, but which should be obvious, you cross
OVER each line UNLESS it's at a red dot, in which case you go
UNDER the line. ed. We now return you to your program in
progress.)
Continue following the numbers around till you reach #18, the
second crossing point with a red dot, again tuck your end under
(fig. 5).
Continue on, tucking under at each red dot till you finish, past
#88 to #1 again (fig. 6).
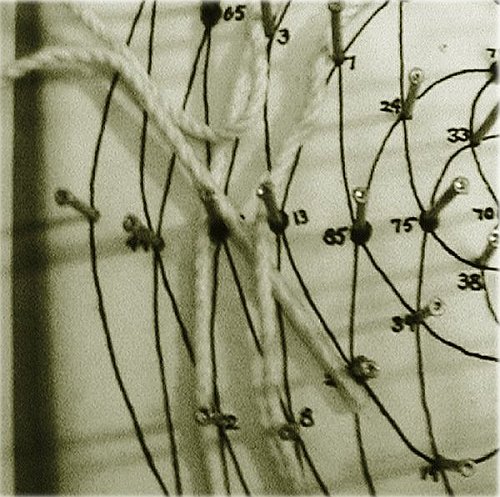
In fig. 7 you'll see two red dots and a green one with lines going
to their respective spots on the cross. These represent the top
bar hole (green) and the crossarm holes (red).
Carefully lift the knot up off the nails without disturbing these
three holes (fig. 8)
Here's the knot off the nails altogether but still maintining the
three holes and ready to be placed onto the mandrel for
tightening up a bit and then the additional two passes
(fig. 9).
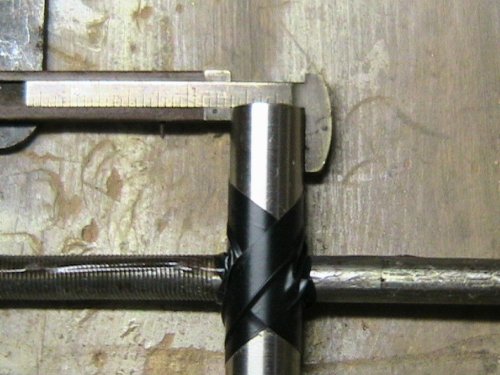
Fig. 10 shows the tubing for the mandrel in this tutorial, 5/8" for
the vertical piece with a hole drilled through for the 3/8"
horizontal piece. You can use any size tubing/pvc pipe or even
solid wood with half laps. The bigger you use, the bigger the
knot can be.
Carefully position the mess over the cross (fig. 11).
I find it handy to put the cross in a bench vise so your hands are
free and you don't lose the bottom of the knot. (fig. 12)
(ed. It's even handier hanving a great honking wood vise for this
purpose... failing that, you can poke the bottom shaft of the cross
thru a piece of cardboard or another piece of pine which should
be large enough to keep the bottom of the turks head from
geting lost at the bottom of the shaft. )
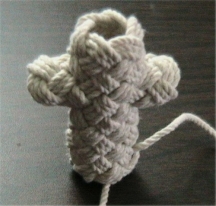
Start anywhere and work your way around the knot tightening up
as with any turks head (fig. 13).
(fig. 14) Shows the line sufficiently tightened to allow starting the
"second pass"
At this point you can continue with the same twine or switch to a
larger size and and follow around as any standard turks
(fig. 15). Turkshead has been "second passed" Time to start
the third pass (final for this size, but with larger mandrels you
can do as many passes as time, ability and insanity may dictate.)
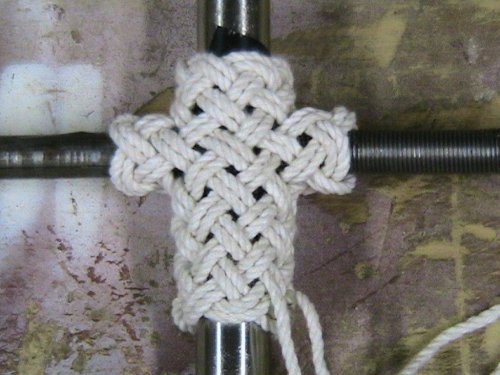
You'll need your spike for those corners (fig.16).
(No! D'ya think???)
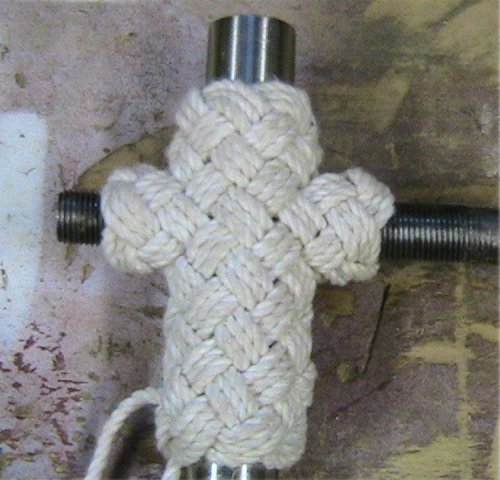
Three times around, tightened up and it's done for this one
(fig. 17)
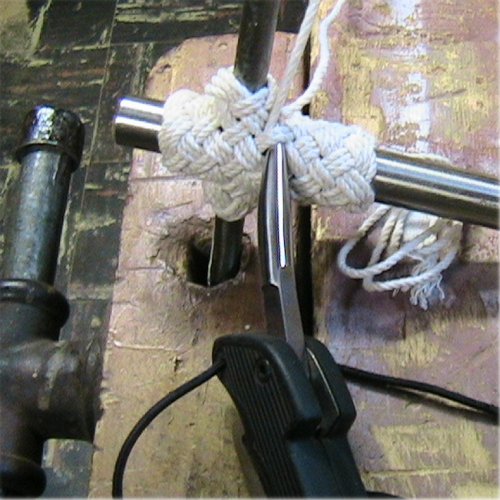
and you can pull the tubes out (fig. 18)
Finish in the usual fashion by sewing the strands together on
the inside of the knot and varnish all. You can also work the
ends up to the top of the knot and use them to start a lanyard.
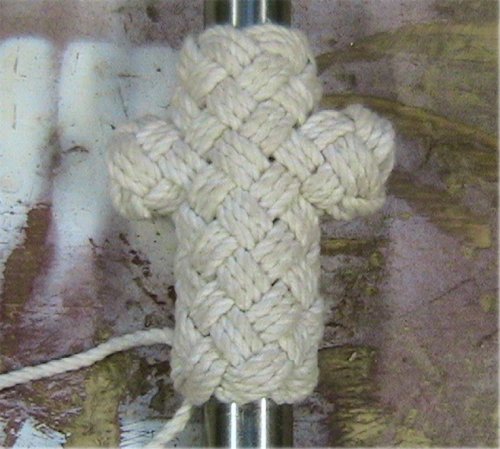
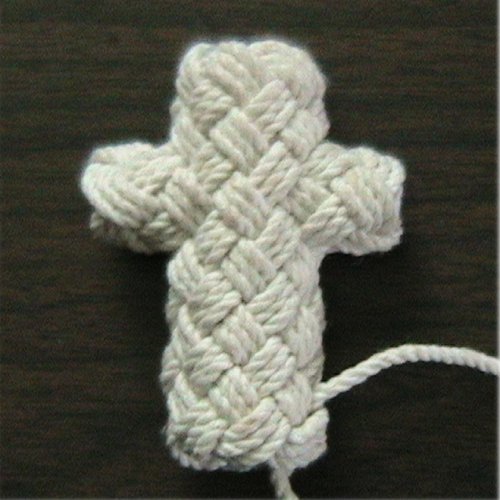
Figs. 19 & 20... finished knot.
Thank you Chris... a very clear and most informative tutorial!
First, DOWNLOAD the chart seen to the right, which is the
pattern for the Turkshead Cross from ABOK (1397).
Print out the turkshead cross pattern at 8 1/2" x 11"
Tape the sheet onto a 1" thick x 10" wide x 12" or 14" long piece
of pine. (ed: If you plan on making a lot of these, leave an
extra inch or so on top, place the pattern off-center vertically and
drill a hole along the top of the board to hang for storage!)
Use 3D 1 1/4" finish nails and put one at every crossing point
(fig. 1)
( For you right handers, start at the upper right and work down to
the lower left, opposite direction for the lefties: fewer bashed
fingers this way! )
Once you've finished, put in a nail at the apex of the outer lines
as well (fig. 2 red arrows).
To start off I'll be using some 1/8" x 3 strand cotton twine. It's
best to use something small to start as the knot gets a bit
crowded otherwise. You'll need at least 20' to go all the way
around the board.
Tie a slip knot at one end and put it around the #1 pin. Work your
way around following the numbers. (fig. 3)
When you reach #13 you'll come to the first crossing with a dot.
Tuck your end under (fig. 4).
(As Chris forgot to put in, but which should be obvious, you cross
OVER each line UNLESS it's at a red dot, in which case you go
UNDER the line. ed. We now return you to your program in
progress.)
Continue following the numbers around till you reach #18, the
second crossing point with a red dot, again tuck your end under
(fig. 5).
Continue on, tucking under at each red dot till you finish, past
#88 to #1 again (fig. 6).
In fig. 7 you'll see two red dots and a green one with lines going
to their respective spots on the cross. These represent the top
bar hole (green) and the crossarm holes (red).
Carefully lift the knot up off the nails without disturbing these
three holes (fig. 8)
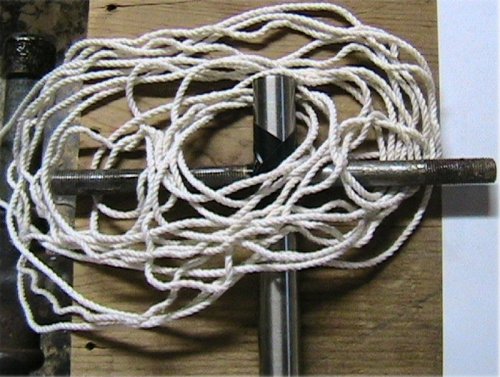
Here's the knot off the nails altogether but still maintining the
three holes and ready to be placed onto the mandrel for
tightening up a bit and then the additional two passes
(fig. 9).
Fig. 10 shows the tubing for the mandrel in this tutorial, 5/8" for
the vertical piece with a hole drilled through for the 3/8"
horizontal piece. You can use any size tubing/pvc pipe or even
solid wood with half laps. The bigger you use, the bigger the
knot can be.
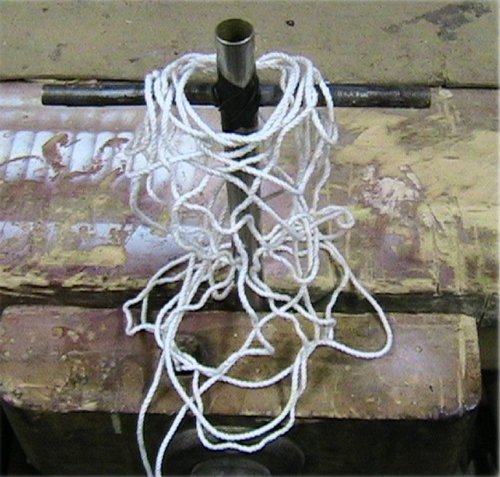
Carefully position the mess over the cross (fig. 11).
I find it handy to put the cross in a bench vise so your hands are
free and you don't lose the bottom of the knot. (fig. 12)
(ed. It's even handier hanving a great honking wood vise for this
purpose... failing that, you can poke the bottom shaft of the cross
thru a piece of cardboard or another piece of pine which should
be large enough to keep the bottom of the turks head from
geting lost at the bottom of the shaft. )
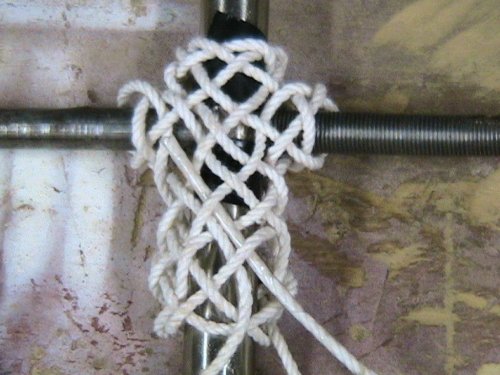
Start anywhere and work your way around the knot tightening up
as with any turks head (fig. 13).
(fig. 14) Shows the line sufficiently tightened to allow starting the
"second pass"
At this point you can continue with the same twine or switch to a
larger size and and follow around as any standard turks
(fig. 15). Turkshead has been "second passed" Time to start
the third pass (final for this size, but with larger mandrels you
can do as many passes as time, ability and insanity may dictate.)
You'll need your spike for those corners (fig.16).
(No! D'ya think???)
Three times around, tightened up and it's done for this one
(fig. 17)
and you can pull the tubes out (fig. 18)
Finish in the usual fashion by sewing the strands together on
the inside of the knot and varnish all. You can also work the
ends up to the top of the knot and use them to start a lanyard.
Figs. 19 & 20... finished knot.
Thank you Chris... a very clear and most informative tutorial!

Pattern:
Click on it
and when
the larger
pic loads,
save that
one to your
printer!
FIG 01
FIG 02
FIG 03
FIG 04
FIG 05
FIG 06
FIG 07
FIG 08
FIG 09
FIG 10
FIG 11
FIG 12
FIG 13
FIG 14
FIG 15
FIG 16
FIG 17
FIG 18
FIG 19
FIG 20


| Click on any picture to bring up a larger verzion! |