| 17 STRAND French Sennit by BM2 Jack Cross (USN Ret) |
| ~~~~~~~~~~~~~~~~~~~~~~~~~~~~~~~~~~~~~~~~~~~~~~~~~~~~~~~~~~~~~~~~~~ |
| Click on ANY picture to see a larger version: Small pictures here are to allow dial-up customers easy access |
| Last updated 03-08-2018 |
The French 17-strand sennit produces a lovely "french twist" in the pattern of the sennit and I thank Mr. Cross for having contributed the tutorial
for us. You can see some more of his work HERE.
for us. You can see some more of his work HERE.

| BACK FRONT |
TUTORIAL FOR 17 STRAND FRENCH SENNIT BOSUN LANARD
Cut eight pieces of cord 12 ft long and one 6 ft long.
“Middle” the 12ft length. This gives us 16 strands at 72”. The single 6 ft strand will make the
17th. strand.
(You want to treat the ends of the cord to keep them from fraying out while working. I use
CyanoAcrylate (super Glue) but be sure you get the THIN or FAST-SETTING type with the sort
of bottle with a nozzle so you can apply only a small quantity to the line. Always work over a piece
of scrap (carpet, cardboard, whatever) when applying CA to line... it has a tendency to drip off the
end and then ‘someone’ is gonna be all over you for ruining the carpet/floor/her life... caution is
advised!... ed)
If using Nylon burn the loose ends. When starting and if using nylon carefully fuse (or tie) the
strands together about 5 inches down from the start. If using cotton or similar cord seize the
strands by wrapping with a small diameter cord.. The purpose of leaving the extra cord at the
beginning is to give you something to work with when bringing the two ends together after you
finish your neckpiece.
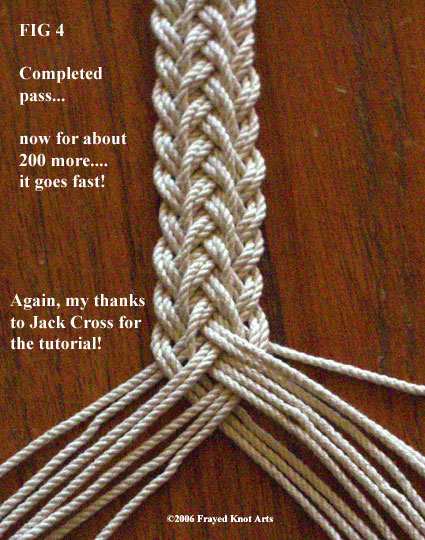
Secure the strands to a fixed object then separate the cords with a group of ten on one side and
seven on the other. (see fig 1) Starting with the ten side on the left (or right...doesn’t matter... ed.)
side, plait the three outboard lines over two and under five (See figs 2 & 3). Now you have ten
strands on the right and seven on the left (see fig 4). Reverse the plaiting, three over two and
under five. Continue this way until you get the length of the Lanyard to fit over your head.
Be careful to keep the seven and ten groups separated or you will have to undo several plaits to
figure out where you went wrong. Also about every five plaits separate the loose hanging cords to
keep them from being tangled. If using nylon you can usually shake the cords and pull a couple
out from the tangled mess. It is pretty easy to do this but if you make too many plaits without
un-tangling the loose ends, it is much more difficult. When doing this make sure you keep the part
you are working with separated. After you get the hang of it, you should be able to finish this
section in an hour or less.
(If you’re in the Military, active or reserve, be sure the lanyard is large enough to put on and take
off without disturbing your cover! I can’t tell you the number of times some 06+ or CPO asked
me to take it off so they could look at mine... ed.)
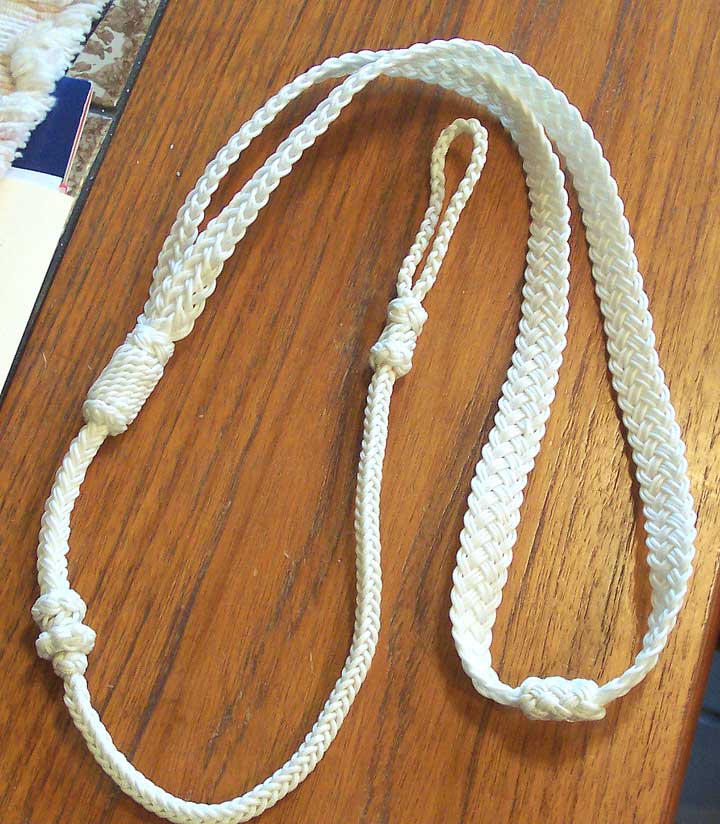
When you get to the desired length of the neckpiece of the lanyard, bring the two ends of the
plaited lanyard together. Make sure you keep the ten and seven groups of strands separated until
you tie the ends together.
Using one of the loose strands wrap the two ends together. This part will later be covered with a
Turks head so don't make the wrap too long. Cut off close to the wrap the 17 loose strands you
started with ( the extra 5 inches) Take eight of the long loose ends ( four from each outside edge )
and get them out of the way for now. With the other nine strands that are now in the middle,
bundle eight for a core and with the other strand make continuous half hitches around it. (see pic
below) Do this for about 4 inches to make your strop (instead of the half hitches you could
substitute a round or square plait if you like). Cut off the eight strands that you placed out of the
way. On the end you are working with cut of two of the nine strands. If using nylon burn the
loose ends. Take one of the seven remaining strands and place it over a chair or something to get it
out of your way for now. With the remaining six strands make a simple over and under plait in
groups of two over two continuous reversing the process until you achieve about an eight-inch
length. (see pic below) Bring the loose ends together at the starting point where the half hitch
section ends and wrap them together with the loose single strand that you had gotten out of your
way. Cut off all the extra loose ends. Where the sections come together will require Turks heads
to cover the wraps.
If you don't want to make a large Turks head with several bights, use a slightly larger cord and
chase it around four of five times. How you end it off is up to you.
(See also Cbrew’s 9 and 17 strand double-braided lanyard tutorials for more ideas on finishing off
the lanyards. ed.)
NOTE! Our thanks go to "JW" who emailed me that the numbers in red (originally 8t and 4 ft)
would not produce a sufficiently long braid to successfully complete the lanyard.
Line usage: if making a belt or long sennit for a frame, allow 1.5:1 on
the cut - 12" raw line will give you about 8" of sennit. Experiment with
this! Size of line WILL affect the ratio!
Cut eight pieces of cord 12 ft long and one 6 ft long.
“Middle” the 12ft length. This gives us 16 strands at 72”. The single 6 ft strand will make the
17th. strand.
(You want to treat the ends of the cord to keep them from fraying out while working. I use
CyanoAcrylate (super Glue) but be sure you get the THIN or FAST-SETTING type with the sort
of bottle with a nozzle so you can apply only a small quantity to the line. Always work over a piece
of scrap (carpet, cardboard, whatever) when applying CA to line... it has a tendency to drip off the
end and then ‘someone’ is gonna be all over you for ruining the carpet/floor/her life... caution is
advised!... ed)
If using Nylon burn the loose ends. When starting and if using nylon carefully fuse (or tie) the
strands together about 5 inches down from the start. If using cotton or similar cord seize the
strands by wrapping with a small diameter cord.. The purpose of leaving the extra cord at the
beginning is to give you something to work with when bringing the two ends together after you
finish your neckpiece.
Secure the strands to a fixed object then separate the cords with a group of ten on one side and
seven on the other. (see fig 1) Starting with the ten side on the left (or right...doesn’t matter... ed.)
side, plait the three outboard lines over two and under five (See figs 2 & 3). Now you have ten
strands on the right and seven on the left (see fig 4). Reverse the plaiting, three over two and
under five. Continue this way until you get the length of the Lanyard to fit over your head.
Be careful to keep the seven and ten groups separated or you will have to undo several plaits to
figure out where you went wrong. Also about every five plaits separate the loose hanging cords to
keep them from being tangled. If using nylon you can usually shake the cords and pull a couple
out from the tangled mess. It is pretty easy to do this but if you make too many plaits without
un-tangling the loose ends, it is much more difficult. When doing this make sure you keep the part
you are working with separated. After you get the hang of it, you should be able to finish this
section in an hour or less.
(If you’re in the Military, active or reserve, be sure the lanyard is large enough to put on and take
off without disturbing your cover! I can’t tell you the number of times some 06+ or CPO asked
me to take it off so they could look at mine... ed.)
When you get to the desired length of the neckpiece of the lanyard, bring the two ends of the
plaited lanyard together. Make sure you keep the ten and seven groups of strands separated until
you tie the ends together.
Using one of the loose strands wrap the two ends together. This part will later be covered with a
Turks head so don't make the wrap too long. Cut off close to the wrap the 17 loose strands you
started with ( the extra 5 inches) Take eight of the long loose ends ( four from each outside edge )
and get them out of the way for now. With the other nine strands that are now in the middle,
bundle eight for a core and with the other strand make continuous half hitches around it. (see pic
below) Do this for about 4 inches to make your strop (instead of the half hitches you could
substitute a round or square plait if you like). Cut off the eight strands that you placed out of the
way. On the end you are working with cut of two of the nine strands. If using nylon burn the
loose ends. Take one of the seven remaining strands and place it over a chair or something to get it
out of your way for now. With the remaining six strands make a simple over and under plait in
groups of two over two continuous reversing the process until you achieve about an eight-inch
length. (see pic below) Bring the loose ends together at the starting point where the half hitch
section ends and wrap them together with the loose single strand that you had gotten out of your
way. Cut off all the extra loose ends. Where the sections come together will require Turks heads
to cover the wraps.
If you don't want to make a large Turks head with several bights, use a slightly larger cord and
chase it around four of five times. How you end it off is up to you.
(See also Cbrew’s 9 and 17 strand double-braided lanyard tutorials for more ideas on finishing off
the lanyards. ed.)
NOTE! Our thanks go to "JW" who emailed me that the numbers in red (originally 8t and 4 ft)
would not produce a sufficiently long braid to successfully complete the lanyard.
Line usage: if making a belt or long sennit for a frame, allow 1.5:1 on
the cut - 12" raw line will give you about 8" of sennit. Experiment with
this! Size of line WILL affect the ratio!


| ~~~~~~~~~~~~~~~~~~~~~~~~~~~~~~~~~~~~~~~~~~~~~~~~~~~~~~~~~~~~~~~~~~ |
Variation to the above instructions: when you first lay
up your lines, cut 17 to 72" length, clamp all 17 once
assembled at the midpoint, then work from the center
out on both legs... this will give you a "mirror image"
braid on both sides. Cover the start point with another
turkshead or fancy wrap. Experiment with this and
you'll see a very nice lanyard emerging! ed.)
Here's one I did: mirrored, with an "over-two" hitching
at the collector knot, and star knots at the ends of the
strop. The "Over Two" took the most time to do!
| If YOU would like to contribute a tutorial on fancy knotting / braiding / sennits, please contact me! We'd love to have it up on the site! |
| ~~~~~~~~~~~~~~~~~~~~~~~~~~~~~~~~~~~~~~~~~~~~~~~~~~~~~~~~~~~~~~~~~~ |
| ~~~~~~~~~~~~~~~~~~~~~~~~~~~~~~~~~~~~~~~~~~~~~~~~~~~~~~~~~~~~~~~~~~ |
Don Wright has a few thoughts on doing the mirrored verzion of the French Sennit:
Vince, here is a couple of pics of the center/reversing section of the 17 strand french sennit lanyard.
The instructions for creating this joint are the same as the ones for the regular 17 strand double braid sennit. Once you get to
the desired length from the center point, go back and start braiding in the other direction, being sure that you've got the
"French" side up. Where you start again makes a perfect X where the ridge strands cross over in front and a 2 strand layer one
time in back. You could almost leave it without a cover knot as the "X" looks real neat. I just love the way the French sennit
looks and am going to try making a belt out of it.


| FRONT REAR |
| ~~~~~~~~~~~~~~~~~~~~~~~~~~~~~~~~~~~~~~~~~~~~~~~~~~~~~~~~~~~~~~~~~~ |

I recently (Dec '08) succumbed to the siren call of theinternet and started a
"Facebook" page... it is rather sily but it DID produce one benefit in that I've been
contacted by many folks who had dropped out of my life.
Pat and Dick Wexelblat of Merion, PA, are two such: Dick is a superb artisan in
wood turnings and his bowls are incredibly pretty, Pat is a former musician who lost
her hearing and then became just as skilled in wire art and jewelry as she was in
music! (She's ALWAYS done artistic knitting!) (Tigerlilly
Workshop main page)
She saw this tutorial page and sent me (the NEXT DAY, mind ya!) this picture,
which looks MUCH better in the larger verzion.
Never thought of doing this stuff in wire, but it looks pretty neat!
Thanks, Pat!

17 strands: 8x5ell, 9x3.5ell 4S/4L/1S/4L/4s 1.4mm=3.6" for 1".
80/side= appx 22. TIE and REVERSE. Tie off at 17.5 per side, separate
strands 16 L inside, 18 S outside. BE NEAT. 2 Double constrictor join
(more if slippy). DO double square with 16 strands for 7", drop 8 and
continue 8 SQUARE for 8, drop four and four-square for 7.5 tie. Make
pretties.
80/side= appx 22. TIE and REVERSE. Tie off at 17.5 per side, separate
strands 16 L inside, 18 S outside. BE NEAT. 2 Double constrictor join
(more if slippy). DO double square with 16 strands for 7", drop 8 and
continue 8 SQUARE for 8, drop four and four-square for 7.5 tie. Make
pretties.