Let's talk tools for a second. The only tools you'll need for this are a dull-pointed awl
or spike and a pair of sharp cutters of some sort. I favour something called 'cuticle
nippers' which I get from my local big-box drugstore chain when they're on sale. They
run (2008) about $16 regularly, but if you keep an eye out you can get them for $6 or
$7. They last for about two months or so if resharpened gently on a stone and they
give the best and closest cuts I've found. Failing that, a very sharp knife will do just
as well, but you must have complete control over it to prevent cutting the other parts of
the work by misteak. (My hands shake, so I use the cuticle nippers.)
The spike should NOT be a sharp-pointed one, as you will only be using it to clearance
a hole to poke the end of the line thru, not actually penetrating the line itself.
Well, THAT was clear as mud, then.
GLUING THE ENDS:
It is most helpful if you glue up the ends of your lines with quick-drying super-glue and
allow them to harden up. Do about 1-1/2" for each line end. If you're using the rayon
or a cotton line, the ends will harden in anywhere from 4 seconds to a minute or so,
depending on how much you put on, the ambient humidity and temperature and the
current phase of the moon.
Just so I can sound like Norm Abrams, "REMEMBER THAT THERE IS NO MORE
IMPORTANT RULE THAN TO USE A PIECE OF CARDBOARD OR AN OLD
RUG TO WORK OVER WHEN USING SUPER-GLUE !" Also, DO NOT breath
in the fumes! If necessary, set a small fan to provide air circulation AWAY from you.
They not only smell bad, but they are dangerous to your health.
CLIPPING THE ENDS:
Pretty self-explanatory. I use nippers which are no longer sharp enough for fine work
for this or a small pair of electrical wire cutters...
Cut at a 45 degree angle once the end is good and hard and you'll have a threading
needle end that will probably last the job thru. Beats the (censored) out of the brass
or aluminum "threading deedles" that some people use.
STARTING THE LIFESAVER:
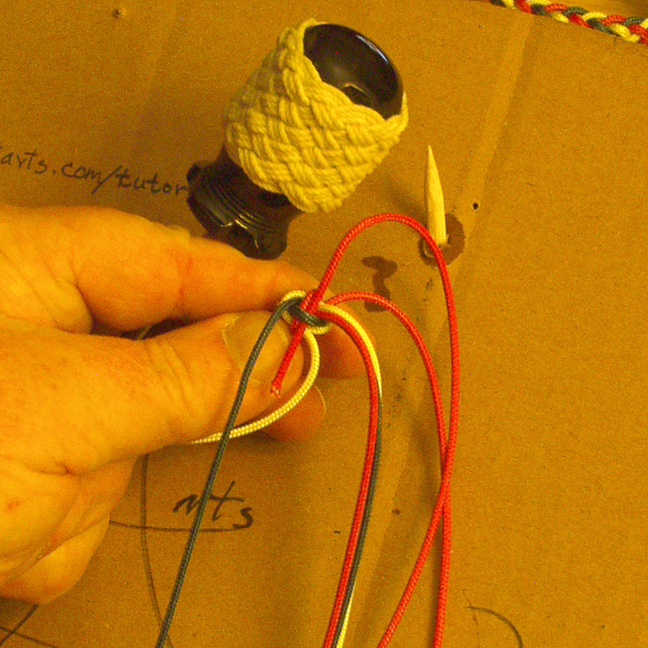
Allow about 18" per side (36" per line) for the construction... that is, measure a full
yard in each of the red, white and blue, then 'middle' the lines (find the centre of each)
and then clamp them about 2" away from the center as shown to right. You'll be
making a flat braid BACK in the direction of the middle and past it to form your loop.
Do the braid firmly for about thirty full passes, then just pinch it with your fingers.
(When speaking of a "FULL PASS" I mean one set of passes, one left and one right.
Count your passes from the LEFT side...trust me.)
STARTING THE BRAID COMPLETED
Still pinching the end, take the clamp off and then even up the ends of the lines. Be
sure you have sufficient braid to do the next step.
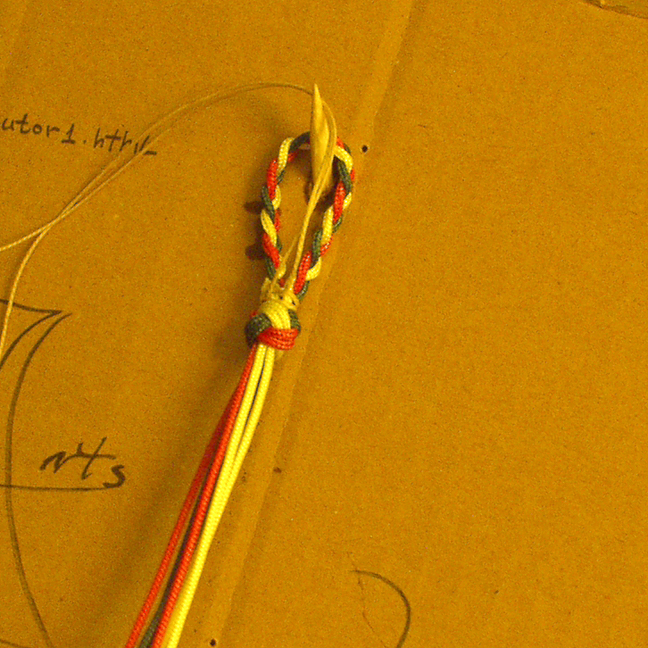
Next, you will fold the braid over and count off NINE , then pinch it there... When I say "Count off
NINE", I'm referring to the loops formed by the colors: counting down (9) on one side actually give
you {18} braid passes... (I trust that's as clear as mud?)... then arrangethe loop so that you have two
of the same color as shown to right above, then tie the braid off there to be ready for the next step.
You can tie it using thread or string, but I have some sailtwine available to me and so I use that. Any
small, tough line will do just fine. I use a "slippery clove hitch" for this... tie a standard clove hitch
but put a loop thru the second leg so that both ends point back one way and you can get a nice, tight
strop which is easily pulled out when you're finished with it, which will be almost immediately.
(Slippery clove 1) (Slippery clove 2)
Now invert the work and arrange the strands as shown to right, alternating colors. If a
solid color work, then just arrange them neatly so that you can perform the next step
easily.
Separate one line of each color as shown and lead them up in a bundle away from
your hand... (I hold 'em in my mouth, but you can clip 'em to your ear, if you like.) this
forms the "core" of the footrope knot.
Now we form the Crown part of the footrope knot: quite simple, really, and useful in
SO many applications.
Just take the three lines left out and loop them as shown. I left it loose so you can see
how this goes... and that's the Crown portion of the knot.
(Expand the picture for detail...I would)
The Wall portion of the knot is nothing but another Crown, just done under and UP
instead of over and DOWN ! Since we're working with a small piece here, the easiest
way to do this is to INVERT the work and do the Wall as you did the crown above. In
practical uses, you don't always have this option, so it's better to learn how to do
everything in the same orientation...
Note that the line continues moving in the same direction, always. If you start your
crown counter-clockwise, the wall also goes counter-clockwise..
Doubling the footrope knot give it some heft and improves it's appearance. Again,
increasing the picture will let you see what I talk about here. As you look at the knot,
the line comes up and across the top NEAREST the core lines. Take your spike and
(if necessary) clearance a space for the tip of the doubling line to go under as shown,
then gently pull it thru.
Do this for all three lines until you get the crown portion doubled up neatly.
Next, we double the wall portion, but this goes just a bit differently: We're
PENETRATING the knot with the spike to clearance the end of the doubling line and it
will go INTO the center of the knot and come out right alongside it's color mate in the
core lines. The pictures are much better at explaining this than are words.
ONE shows the spike going into the center... in this case. it goes below BOTH the white
and blue lines and comes out as shown.
TWO shows the red doubling line replacing the spike and I think that it's a bit clearer to
see where the line is going.
THREE, of course shows the entire footrope knot doubled up and hung on the working
peg, ready for braiding. (You can now remove that clove hitch.)
(Buggar, if I'd known it were gonna be THIS hard to explain......)
WORK TABLE:
A quick word about a work table. I use a "T.V.table" for my work surface. In the US
they're sold in sets of four with a stand for storage and you can usully get them for
(2008) $<50 the set at a discount mart. GET THE SOLID WOOD ONES! THEY LAST
A LOT LONGER! You'll note I have a spool of line suspended between the legs. I
can put between four to eight spools of line under the table, which greatly reduces it's
tendency to tip forward. Along the front edge, I've bolted a 2" square piece of soft
wood (the scrap end of a baluster for an outdoor deck) and drilled holes in it to give
me pegs for working. Strapped around that are two upright pegs to hold work in
progress. Cheap, reliable and easily transported. Also in the background you can
see my TV and that's REALLY helpful preserving my (alleged) sanity.
OK: Back to work.
THE BRAIDED SECTION:
The braided part is a six-strand half-round (or Reefing) braid. I use it because it
produces a flat section on one face which is comfortable to wear.
To start it, I hang the loop on a peg and then separate the three colors to each side.
Here, it happened I did White for the first pair, Blue for the middle and then Red for the
inner. Again, in this case, you begin with the white, then use the blue and the red is
last. Once you strighten out the lines, you always start with the pair closest to you,
then the middle and then the farthest.
SETTING UP THE BRAID FIRST PAIR DONE
Get the braid comfortably in both hands, then take the TOP pair and cross the RIGHT
HAND to the LEFT SIDE, then cross the LEFT HAND OVER and to the RIGHT SIDE.
SECOND PAIR FIRST PASS SECOND PAIR - SECOND PASS
The second pair is similar to the first: Take the RIGHT SIDE blue and cross it OVER
the White leg to the LEFT SIDE, then take the LEFT HAND blue and cross it UNDER
the WHITE and OVER the BLUE to the RIGHT SIDE. Confused yet? Wait...
THIRD PAIR - FIRST PASS THIRD PAIR - SECOND PASS
The third pair is NOT the same. Take the LEFT HAND side Red line and bring it
around the BACK of the braid, come up BETWEEN the WHITE and BLUE on the
RIGHT SIDE, continue leading it LEFT and finish up on the LEFT SIDE as shown.
Then take the RIGHT SIDE and do the opposite. You'll now be looking at something
like the picture "Third Pair - Second Pass" above. This is a GOOD thing.
The REST of the braid is made using the method used for the third pair. Tighten
everything up neatly and just continue taking the TOP line on the LEFT around, up
and thru the bottom pairs and continue to the LEFT, then take the TOP line on the
RIGHT.... I think you get the picture.
After a few of these, muscle memory will take over and you'll be able to talk to
someone, watch TV or think about that girl in the string bikini you saw last week at the
boat docks.
(Sorry, didn't see the wife there reading this with you!)
Here's the finished braid, again tied off with the slippery clove hitch, ready to have the
star knot applied to it.
Length is something you'll have to experiment with, but a child's should be ~6 inches, a
woman's about ~7, a medium man's ~8 and a large man's ~9. You'll find that a certain
number of passes equals a certain number of inches, and I refer to my wristlets by that
number.
In 1.4mm line, 36 full passes = appx. 7.5".
Another point: when getting down to the number of passes for the size you're making,
continue for SIX full pair/passes beyond that point so that you can more easliy tie the
braid off at the desired point.
(You'll thank me for that, later.)
Now we have to put either a star-knot or a large footrope knot on it to end it off. That
will be covered on the..............
NEXT PAGE
or spike and a pair of sharp cutters of some sort. I favour something called 'cuticle
nippers' which I get from my local big-box drugstore chain when they're on sale. They
run (2008) about $16 regularly, but if you keep an eye out you can get them for $6 or
$7. They last for about two months or so if resharpened gently on a stone and they
give the best and closest cuts I've found. Failing that, a very sharp knife will do just
as well, but you must have complete control over it to prevent cutting the other parts of
the work by misteak. (My hands shake, so I use the cuticle nippers.)
The spike should NOT be a sharp-pointed one, as you will only be using it to clearance
a hole to poke the end of the line thru, not actually penetrating the line itself.
Well, THAT was clear as mud, then.
GLUING THE ENDS:
It is most helpful if you glue up the ends of your lines with quick-drying super-glue and
allow them to harden up. Do about 1-1/2" for each line end. If you're using the rayon
or a cotton line, the ends will harden in anywhere from 4 seconds to a minute or so,
depending on how much you put on, the ambient humidity and temperature and the
current phase of the moon.
Just so I can sound like Norm Abrams, "REMEMBER THAT THERE IS NO MORE
IMPORTANT RULE THAN TO USE A PIECE OF CARDBOARD OR AN OLD
RUG TO WORK OVER WHEN USING SUPER-GLUE !" Also, DO NOT breath
in the fumes! If necessary, set a small fan to provide air circulation AWAY from you.
They not only smell bad, but they are dangerous to your health.
CLIPPING THE ENDS:
Pretty self-explanatory. I use nippers which are no longer sharp enough for fine work
for this or a small pair of electrical wire cutters...
Cut at a 45 degree angle once the end is good and hard and you'll have a threading
needle end that will probably last the job thru. Beats the (censored) out of the brass
or aluminum "threading deedles" that some people use.
STARTING THE LIFESAVER:
Allow about 18" per side (36" per line) for the construction... that is, measure a full
yard in each of the red, white and blue, then 'middle' the lines (find the centre of each)
and then clamp them about 2" away from the center as shown to right. You'll be
making a flat braid BACK in the direction of the middle and past it to form your loop.
Do the braid firmly for about thirty full passes, then just pinch it with your fingers.
(When speaking of a "FULL PASS" I mean one set of passes, one left and one right.
Count your passes from the LEFT side...trust me.)
STARTING THE BRAID COMPLETED
Still pinching the end, take the clamp off and then even up the ends of the lines. Be
sure you have sufficient braid to do the next step.
Next, you will fold the braid over and count off NINE , then pinch it there... When I say "Count off
NINE", I'm referring to the loops formed by the colors: counting down (9) on one side actually give
you {18} braid passes... (I trust that's as clear as mud?)... then arrangethe loop so that you have two
of the same color as shown to right above, then tie the braid off there to be ready for the next step.
You can tie it using thread or string, but I have some sailtwine available to me and so I use that. Any
small, tough line will do just fine. I use a "slippery clove hitch" for this... tie a standard clove hitch
but put a loop thru the second leg so that both ends point back one way and you can get a nice, tight
strop which is easily pulled out when you're finished with it, which will be almost immediately.
(Slippery clove 1) (Slippery clove 2)
Now invert the work and arrange the strands as shown to right, alternating colors. If a
solid color work, then just arrange them neatly so that you can perform the next step
easily.
Separate one line of each color as shown and lead them up in a bundle away from
your hand... (I hold 'em in my mouth, but you can clip 'em to your ear, if you like.) this
forms the "core" of the footrope knot.
Now we form the Crown part of the footrope knot: quite simple, really, and useful in
SO many applications.
Just take the three lines left out and loop them as shown. I left it loose so you can see
how this goes... and that's the Crown portion of the knot.
(Expand the picture for detail...I would)
The Wall portion of the knot is nothing but another Crown, just done under and UP
instead of over and DOWN ! Since we're working with a small piece here, the easiest
way to do this is to INVERT the work and do the Wall as you did the crown above. In
practical uses, you don't always have this option, so it's better to learn how to do
everything in the same orientation...
Note that the line continues moving in the same direction, always. If you start your
crown counter-clockwise, the wall also goes counter-clockwise..
Doubling the footrope knot give it some heft and improves it's appearance. Again,
increasing the picture will let you see what I talk about here. As you look at the knot,
the line comes up and across the top NEAREST the core lines. Take your spike and
(if necessary) clearance a space for the tip of the doubling line to go under as shown,
then gently pull it thru.
Do this for all three lines until you get the crown portion doubled up neatly.
Next, we double the wall portion, but this goes just a bit differently: We're
PENETRATING the knot with the spike to clearance the end of the doubling line and it
will go INTO the center of the knot and come out right alongside it's color mate in the
core lines. The pictures are much better at explaining this than are words.
ONE shows the spike going into the center... in this case. it goes below BOTH the white
and blue lines and comes out as shown.
TWO shows the red doubling line replacing the spike and I think that it's a bit clearer to
see where the line is going.
THREE, of course shows the entire footrope knot doubled up and hung on the working
peg, ready for braiding. (You can now remove that clove hitch.)
(Buggar, if I'd known it were gonna be THIS hard to explain......)
WORK TABLE:
A quick word about a work table. I use a "T.V.table" for my work surface. In the US
they're sold in sets of four with a stand for storage and you can usully get them for
(2008) $<50 the set at a discount mart. GET THE SOLID WOOD ONES! THEY LAST
A LOT LONGER! You'll note I have a spool of line suspended between the legs. I
can put between four to eight spools of line under the table, which greatly reduces it's
tendency to tip forward. Along the front edge, I've bolted a 2" square piece of soft
wood (the scrap end of a baluster for an outdoor deck) and drilled holes in it to give
me pegs for working. Strapped around that are two upright pegs to hold work in
progress. Cheap, reliable and easily transported. Also in the background you can
see my TV and that's REALLY helpful preserving my (alleged) sanity.
OK: Back to work.
THE BRAIDED SECTION:
The braided part is a six-strand half-round (or Reefing) braid. I use it because it
produces a flat section on one face which is comfortable to wear.
To start it, I hang the loop on a peg and then separate the three colors to each side.
Here, it happened I did White for the first pair, Blue for the middle and then Red for the
inner. Again, in this case, you begin with the white, then use the blue and the red is
last. Once you strighten out the lines, you always start with the pair closest to you,
then the middle and then the farthest.
SETTING UP THE BRAID FIRST PAIR DONE
Get the braid comfortably in both hands, then take the TOP pair and cross the RIGHT
HAND to the LEFT SIDE, then cross the LEFT HAND OVER and to the RIGHT SIDE.
SECOND PAIR FIRST PASS SECOND PAIR - SECOND PASS
The second pair is similar to the first: Take the RIGHT SIDE blue and cross it OVER
the White leg to the LEFT SIDE, then take the LEFT HAND blue and cross it UNDER
the WHITE and OVER the BLUE to the RIGHT SIDE. Confused yet? Wait...
THIRD PAIR - FIRST PASS THIRD PAIR - SECOND PASS
The third pair is NOT the same. Take the LEFT HAND side Red line and bring it
around the BACK of the braid, come up BETWEEN the WHITE and BLUE on the
RIGHT SIDE, continue leading it LEFT and finish up on the LEFT SIDE as shown.
Then take the RIGHT SIDE and do the opposite. You'll now be looking at something
like the picture "Third Pair - Second Pass" above. This is a GOOD thing.
The REST of the braid is made using the method used for the third pair. Tighten
everything up neatly and just continue taking the TOP line on the LEFT around, up
and thru the bottom pairs and continue to the LEFT, then take the TOP line on the
RIGHT.... I think you get the picture.
After a few of these, muscle memory will take over and you'll be able to talk to
someone, watch TV or think about that girl in the string bikini you saw last week at the
boat docks.
(Sorry, didn't see the wife there reading this with you!)
Here's the finished braid, again tied off with the slippery clove hitch, ready to have the
star knot applied to it.
Length is something you'll have to experiment with, but a child's should be ~6 inches, a
woman's about ~7, a medium man's ~8 and a large man's ~9. You'll find that a certain
number of passes equals a certain number of inches, and I refer to my wristlets by that
number.
In 1.4mm line, 36 full passes = appx. 7.5".
Another point: when getting down to the number of passes for the size you're making,
continue for SIX full pair/passes beyond that point so that you can more easliy tie the
braid off at the desired point.
(You'll thank me for that, later.)
Now we have to put either a star-knot or a large footrope knot on it to end it off. That
will be covered on the..............
NEXT PAGE

| The Chesapeake Bay Lifesaver Bracelet |
| Last updated 2008-11-23 |
| Click on any picture to bring up a larger verzion! |
The Chesapeake Lifesaver is a bracelet worn by watermen
in that region which had several purposes: It served as a
lifesaver (if someone was 'going over the side' and you
could grasp his wrist, it was a purchase point to hold him
and bring him back aboard should your handgrip fail), a
"corpse recoverer" (a point where one could pull with a
boathook rather than using a gaff on the body) and as a
distinctive piece of fancywork. They were usually
finished off with a footrope knot, but I like using a starknot
instead as it provides a more secure closure point and
is a lot nicer looking. (IMHO)
At the request of Ron Haralson of Culver city, CA, I have
made up this page to attempt to teach it's construction.
If you have any comments, suggestions or questions,
please contact me by EMAIL or PHONE.

As always, the smaller pictures to the right are linked to larger pictures: to view those, simply click on the picture you wish
to enlarge.
The mechanics of construction are simple: you may use any line you think suitable in size and construction (the two in the
first picture are made of white cotton line (#18ga) and a rayon line used for mini-blinds (about #10ga, or 1.8mm) Sources
for both are listed on the tutorials main page. The loop is a simple three strand flat braid, then a three (or four) strand
footrope knot to a six-strand half-round (gripper or reefing) braid and finally the starknot end. (ABOK #'s 2965, 694,
3003 and 727, respectively.)


| 1 |

| 2 |
| 3 |


| 1 |
| 2 |


